• We have upgaded to the latest version of XenForum and the process finished without any errors!!!! Enjoy the new forum!

Red & Ted's Roadshow Interactive Dual Beacon Topper

mwong168

Administrator
Staff member
Nov 14, 2012
6,654
1,405
113
45
Toronto
rs_trans_lrg.jpg


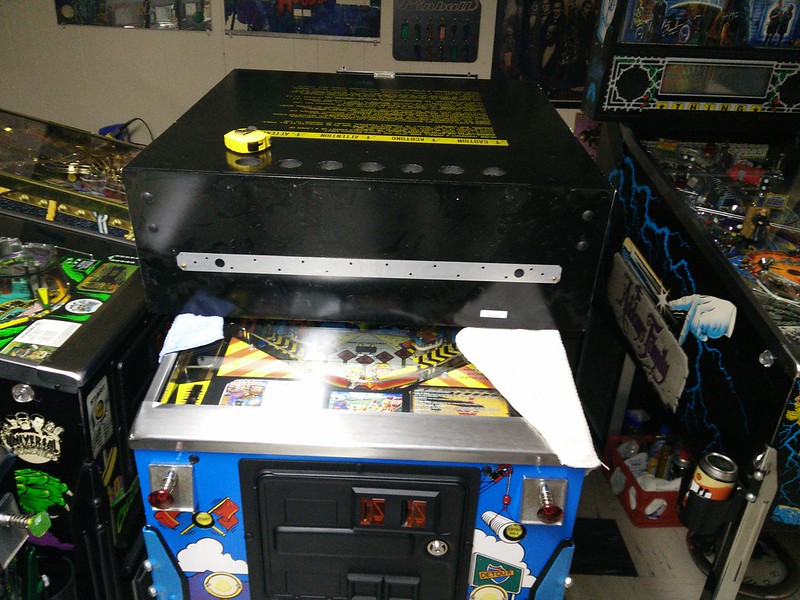
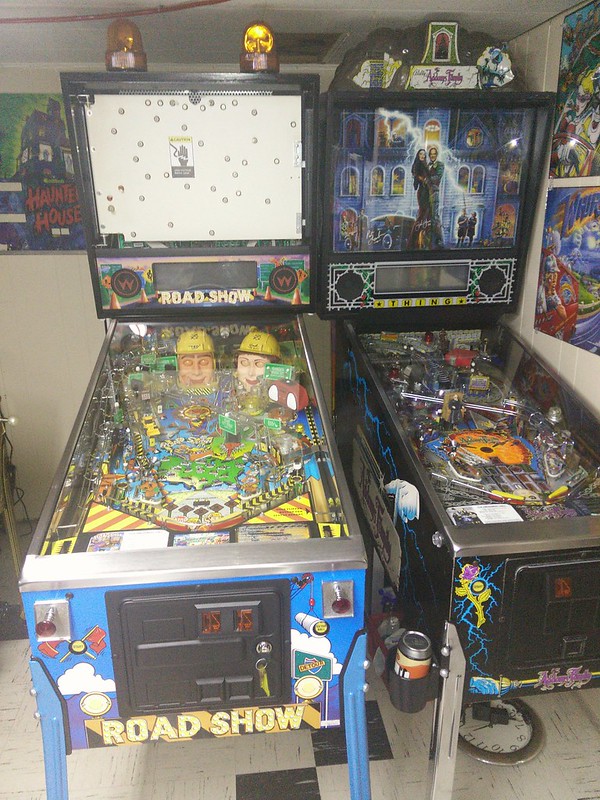
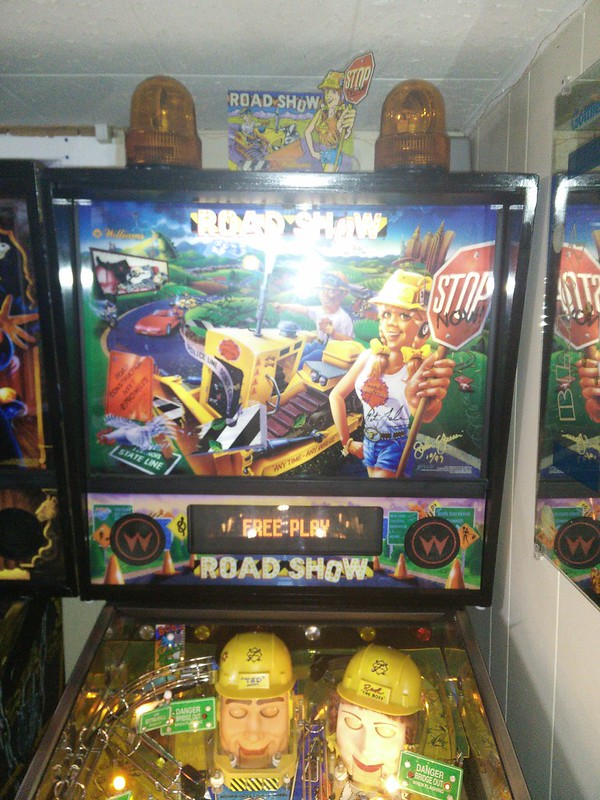
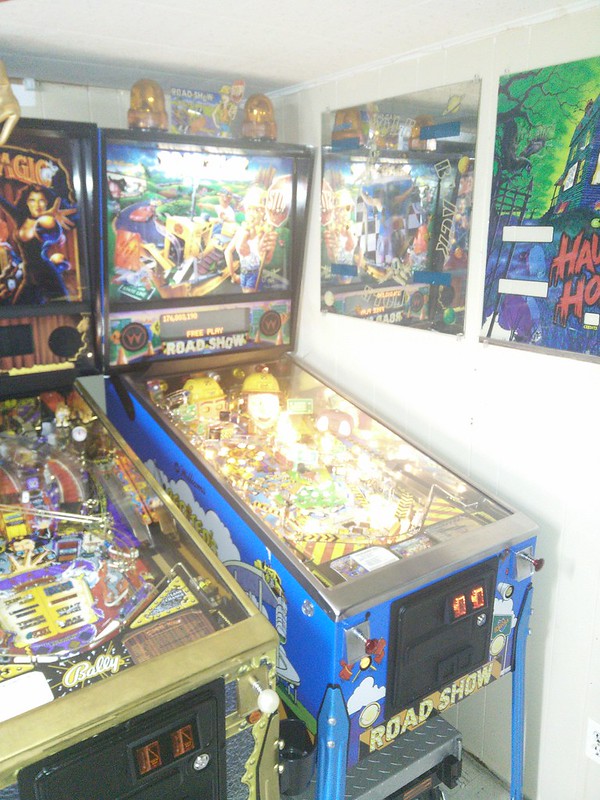
Roadshow is probably one of my personal favorites in the collection as well as my daughter's too. It's got so much charm and character, two to be exact Red and Ted. I think Pat Lawlor's talking heads aka PinMation(tm) is one of the most creative and coolest ball interaction toys in all of pinball.

Ever since seeing Dave from pinballtoppers.com create this dual beacon Roadshow topper over 2 years ago I knew I wanted it one day.

topperwhite.jpg

I spoke to Dave to see if he would be willing to sell me just the electronics portion so I could build my own. His website at the time mentioned a 2-3 week wait time after placing the order. It turns out the piece he was waiting on the metal bracket portion of the topper which I didn't need since I have low ceilings. I figure it would also be cheaper to ship and smaller package so less chance of getting dinged for taxes too. He thought about it for a few days and in the end did not feel comfortable selling me only the electronics because he did that once in the past and someone tried to screw him over by having his design knocked off. I respect his decision as a business owner so I figured out a way to do it and achieve the same effect with more interactivity which you will see shortly.

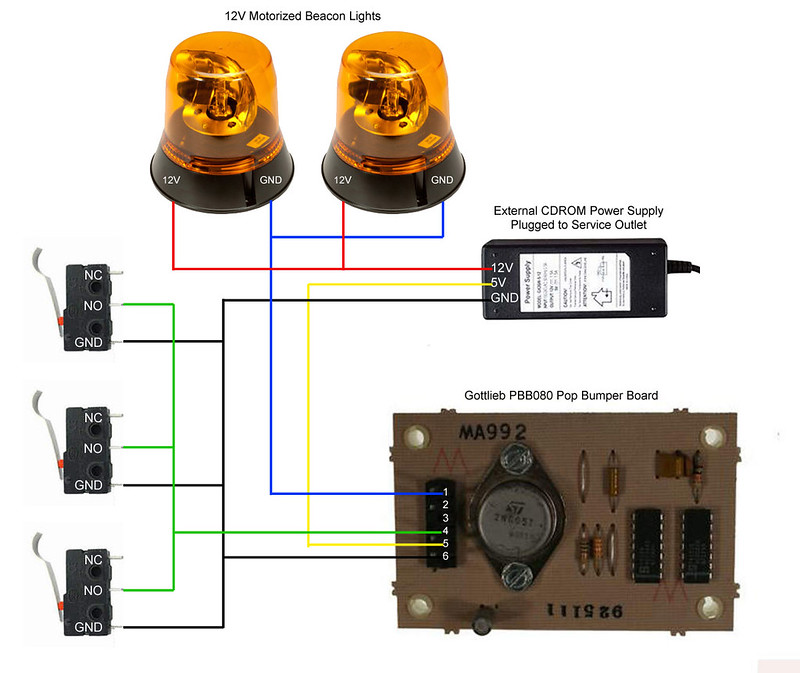
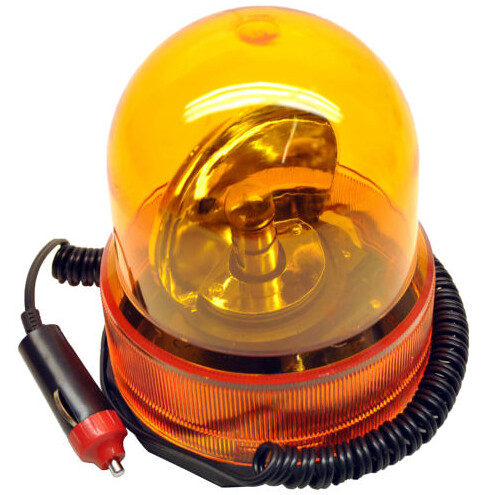
I looked into various safety beacons offered on amazon and ebay. I found a lot of them were pretty expensive and I was worried how bright and effective they would be when lit. I was originally going to tie into the game's power driver board and pull 12v from there. But after a bit of discussion with to Menace he advised me to pay attention to the current draw of some of these beacons as some drew as much as 5-6A. Menace recommend I stay between 1-2A max and a single so I don't over stress the power driver board. So I started looking into LED beacons since I know the current draw on those would be much less and some don't even require a motor as you can achieve the same circular strobbing pattern via LED controller board. Most of the ones were from China and one thing I hate buying from my "cousins" is they rip off other people's pictures or videos so I have no way of knowing for sure if I am getting exactly what is shown. I also didn't wanna deal with charge backs, extra shipping charges, paypal disputes etc... My other problem is some didn't appear as bright or have the same look as traditional ones and expensive too ($80-140usd)!

240strobe-a.jpg


12V-Security-Alarm-Strobe-Signal-Warn-Warning-Siren-Orange-LED-Lamp-Flashing-Light-Free-Shipping.jpg

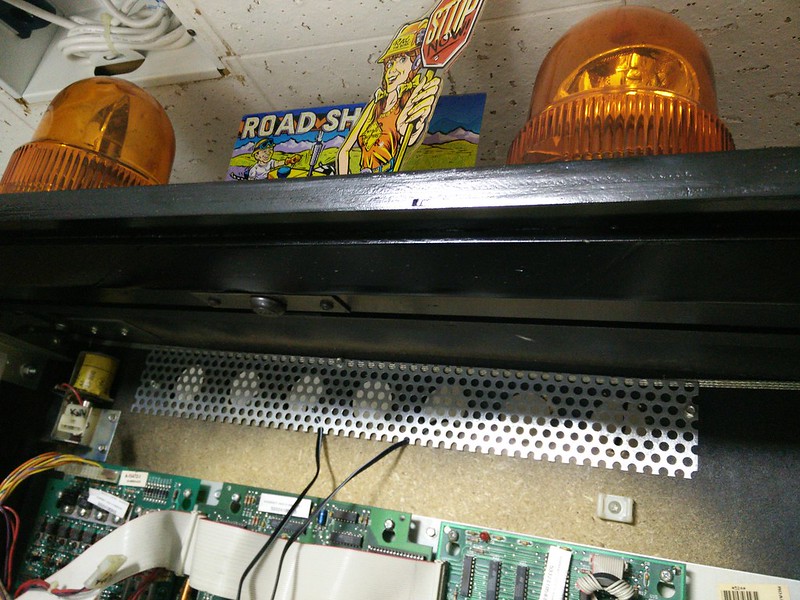
I figured out another solution and was going to use a standard PC power supply plugged in via service outlet. Since I use remotes to turn my games on/off so there would be no power to the service outlet when the game is off. I think there might be a way to wire this outlet so that it only gets powered if the game's main switch is turned on but not needed in my case. Now with power isolated I could reconsider all those motorized ones with higher current draw that give off crazy lighting as seen on games like High Speed and F-14! It just so happened that week Prince Auto had a sale on these Hilux beacons from $46.99 to $19.99 so I picked up two.


22330312760_7834793f28.jpg


http://www.princessauto.com/en/detail/12v-80-fpm-warning-light/A-p8286619e

A few months ago I read on pinside someone used an old Gottlieb sys80 pop bumper board to drive a mini motor for a propeller on their helicopter mod for T2. I think the original idea came from someone doing the same thing for their IJ fighter plane propellers which are usually just gator clipped into the flasher domes. The only problem with this is the propellers would only spin when the flashers had power. The spinning effect also looks weird too since flashers don't get constant power but in pulses so the propellers would spin,stop, spin, stop, spin, stop.
193233.jpg


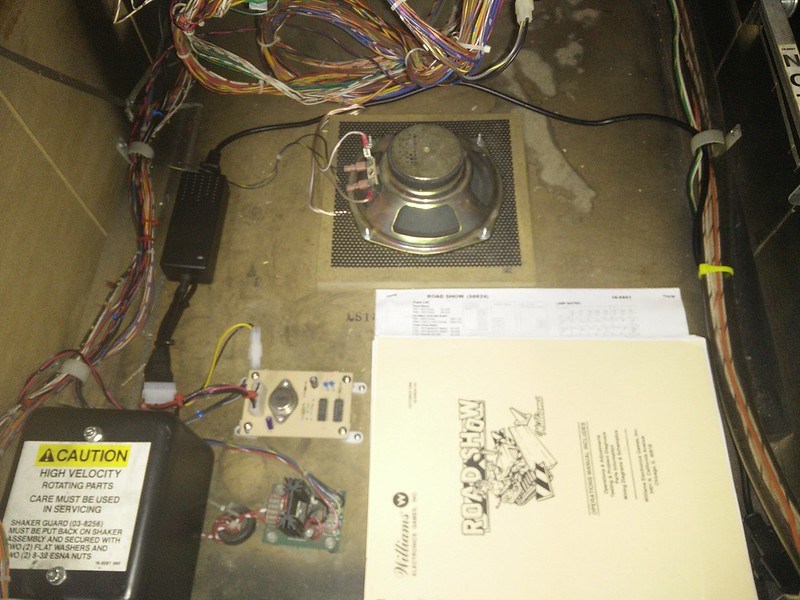
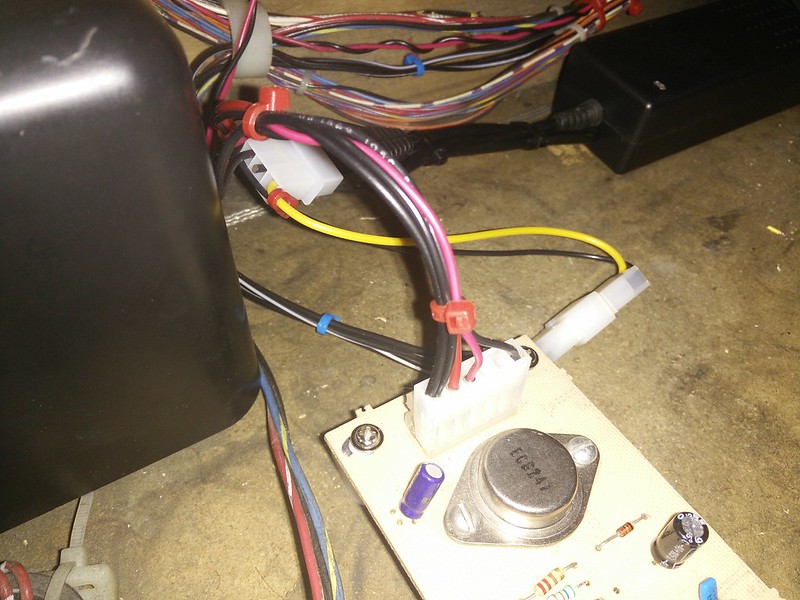
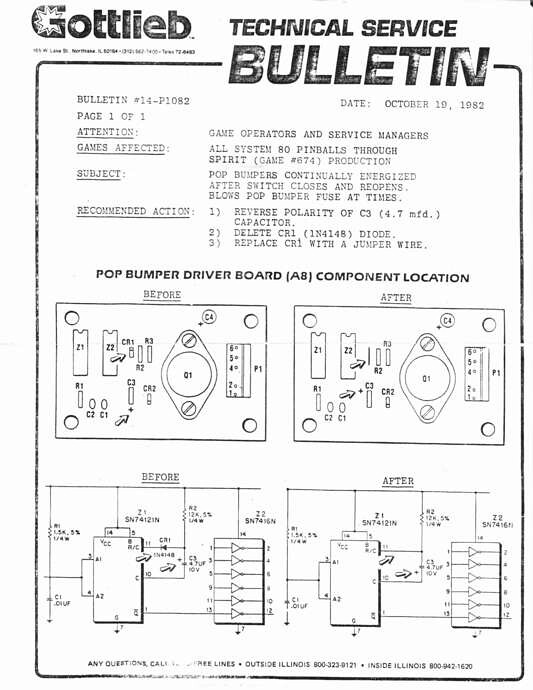
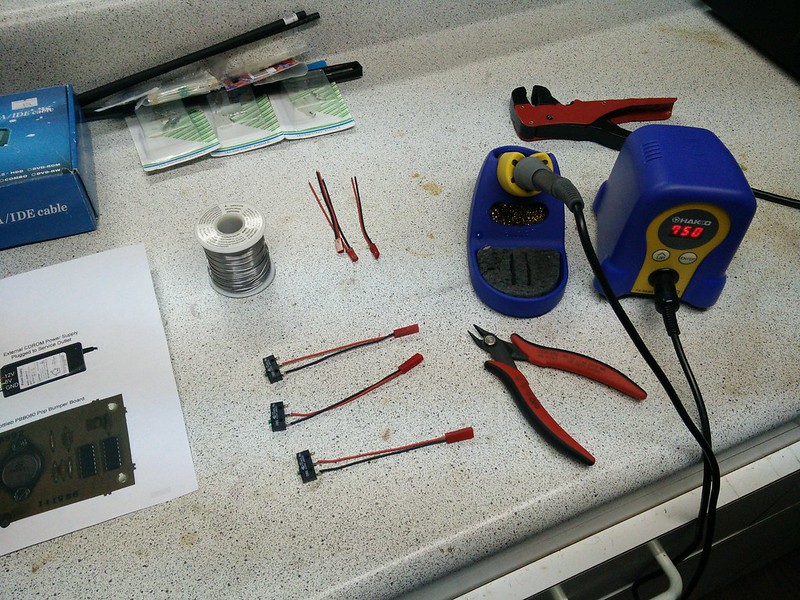
This Gottlieb pop bumper board would allow the propeller to get constant power to spin for anywhere from 1-7 seconds. I figure this could be applied the same way for driving the beacons for my topper. This method does require more work such as adding a dedicated power supply and inline switch(s) to trigger. I picked up a used and confirmed 100% working pop bumper board from ebay for around $32cdn shipped. There are some things you will need to do before you can start using the board as per Gottlieb bulletin here. It is all simple thru hole stuff so anyone with basic soldering skills should be able to do all this in 5-10 mins.

22467710696_e6e9cc6f6f_b.jpg


I only found out after that Rottendog makes a replacement for this pop bumper board for around the same cost with more modern components.

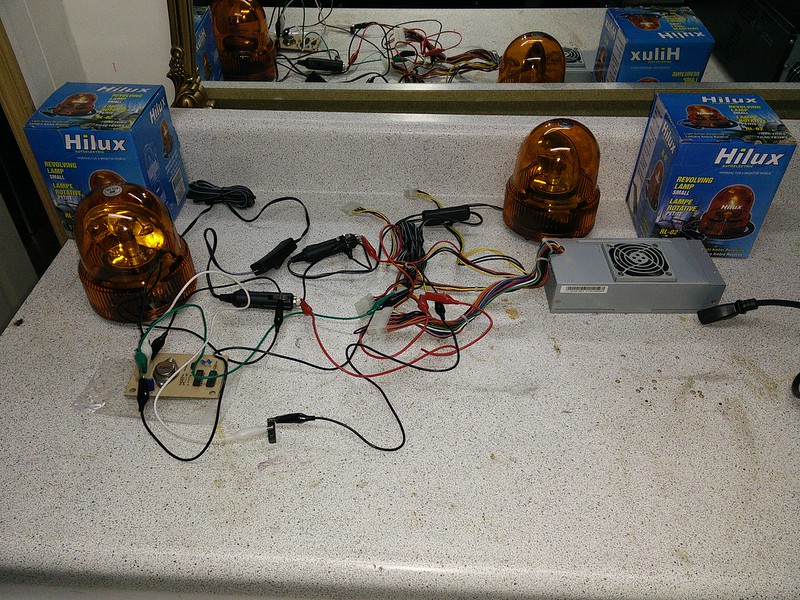
I hooked everything up temporaily on a work bench and you can but in the video below the beacons only come on for a split second whenever I would engage the DB3 switch (listen for the clicking).

22292926468_296f6c7843_c.jpg


Now to address this you will need to change R2 resistor and C3 cap on the pop bumper board to get the beacons to turn on for the right amount of time. Here are some resistor and capacitor values to get specific timing

21897275643_198de56507_m.jpg


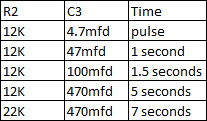
I changed R2 with 22K and C3 with 470mfd to get 7 seconds of power to both beacons. You can see in the video how long the beacons stay on after I engage the the DB3 switch just once.


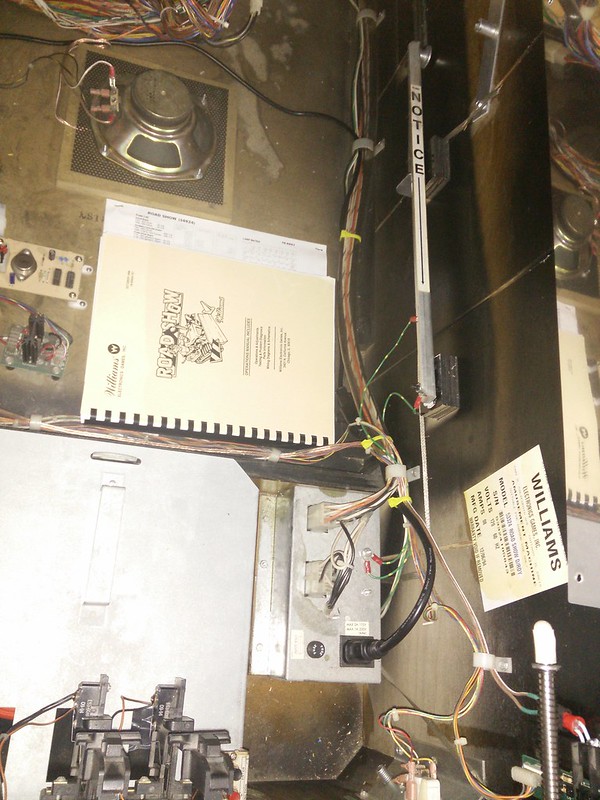
Now my next problem was how do i tie the beacons into the gameplay. I wanted to piggy back off a few of the game's existing switches. I asked Menace for his thoughts and could this mess or blow up the switch matrix. He advised me to check the pin outs with my DMM from the Gottlieb pop bumper board for any voltage since the board itself required 5v in order to drive it's components. It turns out it did have 5v to the pin out to the switch so I didn't wanna take a chance. It would have saved me a lot of work but in turn could cause me (or Menace) a lot of grief by having to call him in to troubleshoot and fix it :)

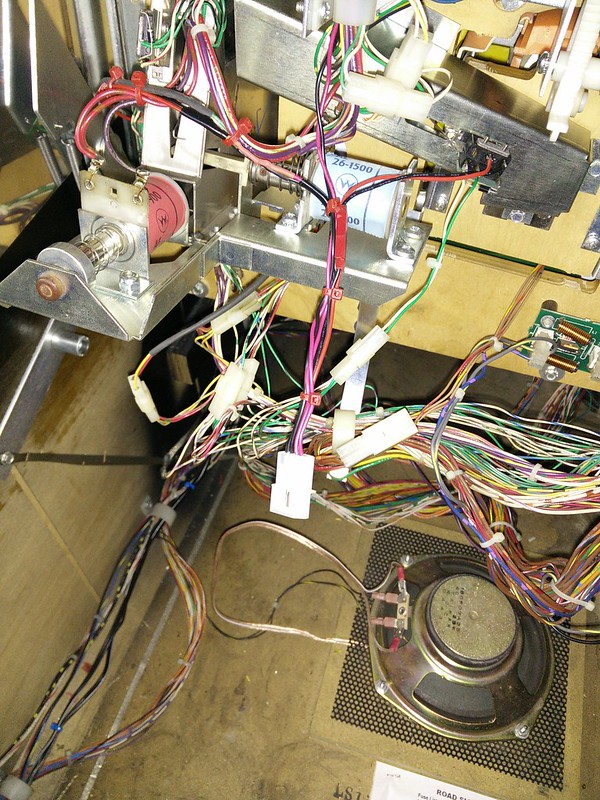
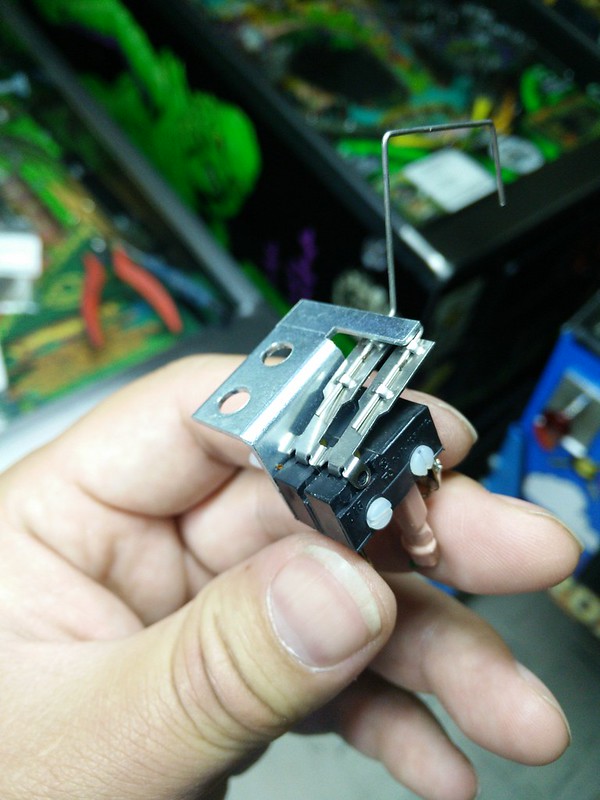
I added an extra switch inline and cut the wire form actuator so it would get triggered the same time as the game's switch as seen here. The existing #2-56 metal screw were not long enough to thread through both switch bodies so I used some 1" #2-56 nylon ones I had in my parts stash. These were later replaced with 3/4" #2-56 machine screws with an allen head from a local place down the road called Bolts Plus on Steeles.

22480609305_a3dc2c144b_c.jpg


22467241702_a278178537_c.jpg


I wanted the beacons to go off when:
1) Shoot the ball into Ted's mouth to start multi-ball
2) Shoot the ball into Ted's mouth for Jackpot
3) The ball gets diverted to left shooter lane for Flying Rocks
4) Ball gets diverted from right ramp so it comes down the left side feeding mini flipper for blast zone shot

22491639481_9c6019deeb_c.jpg


#1 and #2 trigger point under playfield subway for Ted

22467253162_890ed09337_c.jpg


#3 trigger point roll over switch

22491639471_98de77a518_c.jpg


#4 trigger point roll over switch

22491607091_a14bb1a26d_c.jpg


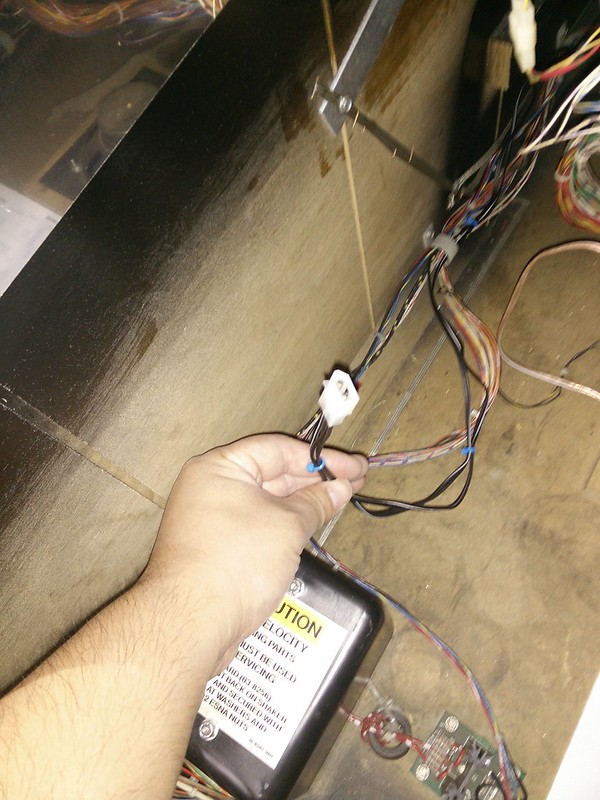
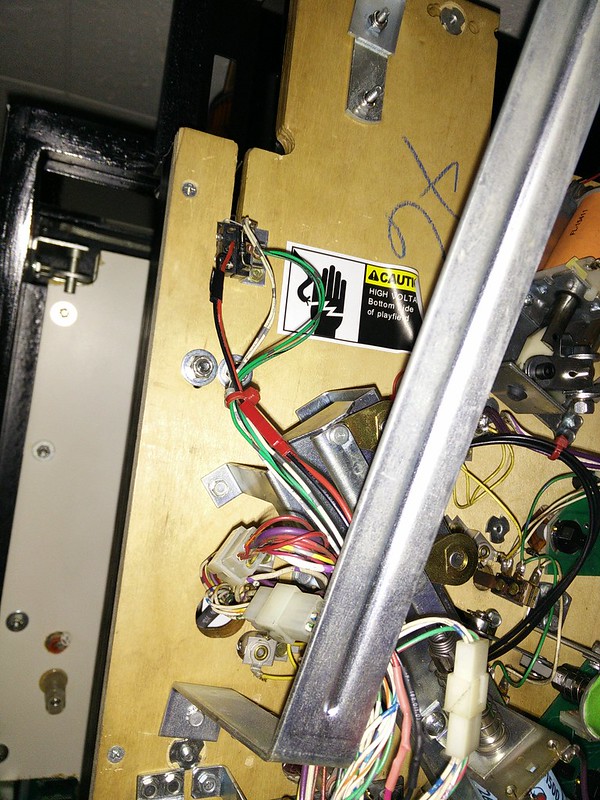
I ran all the switch wires towards the bottom of the playfield and used a 2 pin molex connector so that it could be easily disconnected if I ever needed to pull the playfield out of the cab.

22467242882_7dca932388_c.jpg
 
  • Like
Reactions: superjackpot

mwong168

Administrator
Staff member
Nov 14, 2012
6,654
1,405
113
45
Toronto
Now it was time to install and wire up the beacons. I took advantage that the beacons had a magnetic base so I picked up a piece of strapping from Home Depot and attached it to the top of my head so I could easily adjust the gap of the beacons to my liking.

22467248552_6a91178baa_c.jpg


22510360685_a6e7f09bbe_c.jpg


I then ran the wiring through the existing holes covered by mesh in the head and down in the body of the cab. I cut the cigarette adapter plug ends and joined both beacons together using a molex connector inside the cab. I should probably have put the molex connector outside behind the head so it can be easily disconnected in case I have to remove the beacons but I wanted to make use of the existing long cord. I've had my Roadshow for just over 4 years now and I don't see it leaving my collection anytime soon :)

22491623881_a42f305aa5_c.jpg


22292905198_d8a2d0feb2_c.jpg


Now I used some plastic PCB stand offs to secure the Gottlieb Pop bumper board to the cab.

DSC_0061.JPG


22491602901_38e345af82_c.jpg


In my test setup I used earlier a standard PC ATX power supply and on the main connector pins #14 (green) & #15 (black) were jumpered so it switches on as soon as you plug into an outlet.

jump-start-3.jpg


Now if you prefer a cleaner setup this is what I ended up using in the end and what I also used to power the ColorDMD in my old STTNG. You can get the plug in power adapter by itself from amazon.ca but it goes from $35-45 plus shipping.


Otherwise you can order this complete kit from my "cousins" on eBay for around $10-12usd shipped. Mine came within 2 weeks of placing the order on ebay via snail mail too.

$_57.JPG


http://www.ebay.ca/itm/USB-2-0-Exte...210109?hash=item2a54da29bd:g:QkkAAOSwyQtVsgfd

Most of the kit you will scrap because when was the last time you needed or used an IDE hard drive? It does come with a nice molex power splitter which the one from amazon.ca doesn't. I cut it up to make my own wiring harness to plug into the Gottlieb pop bumper board and beacons.

22292935558_d4b7ae39b1_c.jpg


I also had to make a wiring harness to connect up the 3 extra switches and I had to make sure I made it the full length of the cab because the connector will be located all the way in the back when the playfield is back in the normal position.

22491618101_9c4b669e19_c.jpg


My Roadshow didn't come with a service outlet you can plug directly into so I had a friend pick up from Pinball Life one of these power extension cords for $2 when he went to Expo last week.

pbl_h-19601-1.jpg

http://www.pinballlife.com/index.php?p=product&id=2232

22292699320_557754a06a_c.jpg


I used some velcro the secure the little power brick and zip ties to tidy up all wiring and extra slack. Here is a final look at all the wiring and connections.

22321764658_f27ede8bea_c.jpg


22520571281_47b27bd2d8_c.jpg


22321759318_4dfb7884d9_c.jpg


22509462885_bc84689f38_c.jpg


22321507650_8a7b670808_c.jpg


Here is all wiring required to make this mod work and video of the topper in action.

21786385539_99dfa208f5_c.jpg


Menace

Well-Known Member
Staff member
Nov 14, 2012
2,440
255
83
Santiago de Aurora
Glad you ended up doing it the way you did... I wouldn't have wanted to get that call to come repair your MPU. At least this way everything is completely separate from the game should anything go wrong.

D
 

mwong168

Administrator
Staff member
Nov 14, 2012
6,654
1,405
113
45
Toronto
Glad you ended up doing it the way you did... I wouldn't have wanted to get that call to come repair your MPU. At least this way everything is completely separate from the game should anything go wrong.

If this happened you won't be getting a call and I will just show up on your door step like some homeless hobo with MPU in hand.

You reset the high score on that game yet?

I don't think I will in this lifetime Adam. Its a good thing it was getting late and you just drained ball #3 stopping only at 17.9 billion otherwise you were well on your way to rolling my Roadshow twice.

Nice work Wong. The topper looks almost like something that would have came from the factory during that era! I'm guessing lots of RS owners will be using your tutorial!

I hope so and that's why I document with as much detail as possible so others can follow it easily. You could use this for other mods in other games too. My next mod will be to knock off this big foot spot light mod in WH20 and will probably be simpler because I can piggy back power off the power driver board. There is no way I am paying $100usd+shipping for a spot light mod when it can be done for 1/3 of the price.


superjackpot

Active Member
Nov 19, 2012
342
45
28
Mississauga, ON
Now it was time to install and wire up the beacons. I took advantage that the beacons had a magnetic base so I picked up a piece of strapping from Home Depot and attached it to the top of my head so I could easily adjust the gap of the beacons to my liking.

22467248552_6a91178baa_c.jpg


22510360685_a6e7f09bbe_c.jpg


I then ran the wiring through the existing holes covered by mesh in the head and down in the body of the cab. I cut the cigarette adapter plug ends and joined both beacons together using a molex connector inside the cab. I should probably have put the molex connector outside behind the head so it can be easily disconnected in case I have to remove the beacons but I wanted to make use of the existing long cord. I've had my Roadshow for just over 4 years now and I don't see it leaving my collection anytime soon :)

22491623881_a42f305aa5_c.jpg


22292905198_d8a2d0feb2_c.jpg


Now I used some plastic PCB stand offs to secure the Gottlieb Pop bumper board to the cab.

DSC_0061.JPG


22491602901_38e345af82_c.jpg


In my test setup I used earlier a standard PC ATX power supply and on the main connector pins #14 (green) & #15 (black) were jumpered so it switches on as soon as you plug into an outlet.

jump-start-3.jpg


Now if you prefer a cleaner setup this is what I ended up using in the end and what I also used to power the ColorDMD in my old STTNG. You can get the plug in power adapter by itself from amazon.ca but it goes from $35-45 plus shipping.


Otherwise you can order this complete kit from my "cousins" on eBay for around $10-12usd shipped. Mine came within 2 weeks of placing the order on ebay via snail mail too.

$_57.JPG


http://www.ebay.ca/itm/USB-2-0-Exte...210109?hash=item2a54da29bd:g:QkkAAOSwyQtVsgfd

Most of the kit you will scrap because when was the last time you needed or used an IDE hard drive? It does come with a nice molex power splitter which the one from amazon.ca doesn't. I cut it up to make my own wiring harness to plug into the Gottlieb pop bumper board and beacons.

22292935558_d4b7ae39b1_c.jpg


I also had to make a wiring harness to connect up the 3 extra switches and I had to make sure I made it the full length of the cab because the connector will be located all the way in the back when the playfield is back in the normal position.

22491618101_9c4b669e19_c.jpg


My Roadshow didn't come with a service outlet you can plug directly into so I had a friend pick up from Pinball Life one of these power extension cords for $2 when he went to Expo last week.

pbl_h-19601-1.jpg

http://www.pinballlife.com/index.php?p=product&id=2232

22292699320_557754a06a_c.jpg


I used some velcro the secure the little power brick and zip ties to tidy up all wiring and extra slack. Here is a final look at all the wiring and connections.

22321764658_f27ede8bea_c.jpg


22520571281_47b27bd2d8_c.jpg


22321759318_4dfb7884d9_c.jpg


22509462885_bc84689f38_c.jpg


22321507650_8a7b670808_c.jpg


Here is all wiring required to make this mod work and video of the topper in action.

21786385539_99dfa208f5_c.jpg


Now this is what I call modding your game!! You designed and built this from the ground up.

I like the choice of isolated power supply and parallel switches. Great documentation too.

The final product looks excellent. Very sweet. Nicely done Mike.
 

Vengeance

Well-Known Member
Nov 14, 2012
1,990
138
63
Keswick, ON
I don't think I will in this lifetime Adam. Its a good thing it was getting late and you just drained ball #3 stopping only at 17.9 billion otherwise you were well on your way to rolling my Roadshow twice.

That's why I figured you would have reset it by now ;)

Never got that invite for your little tourney either.....hmmmm :D
 

TwilightZone

Active Member
Nov 25, 2012
319
66
28
Ottawa, ON
Fantastic work, Mike. Looks awesome. Like you, I love RS. I only sold my last one to buy a nicer one. I don't see it leaving any time soon. Think I'll be keeping an eye on Princess Auto for another sale on those lights.