Holy crap have I been busy. So busy that I've been slacking on posting here, mainly because I haven't had time to correctly document most of the repairs I've been doing out in the wild. This is a quick one that I thought would be good to share, as I wasn't able to find any posts anywhere about this specific issue.
As some of you may know, I had a clients F-14 in my shop months ago with a sound issue. (Found HERE) Well, long story short soon after the client got the game back it started acting up again with other issues. As such he'd had enough of dealing with this game and cut it loose for something else. I now have it in my posession again to try and exercise the deamons!
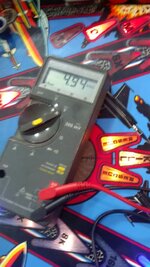
I was told the game would power up and start, but would randomly start to freak out and make crazy noises, the display would be all messed up and the inserts would go crazy. He literally thought the game was possessed. Luckily it didn't take the game long to exhibit these characteristics once I got it all setup, and it actually started showing an IRQ error on the display. I figured it had to be something with the power supply, classic low voltage symptoms. Sure enough a quick probing of the power supply test points with my DMM revealed a 5V rail that was crashing! I think by the time I got the DMM on the test points it had fallen to just over 3VDC, and it got so bad the game actually blew the main line 4A fuse! All of the other voltages on the power supply were rock solid (+12VDC and -12VDC) so I knew I was only dealing with the 5V section.
Now, on the Bally / Williams version of the power supply (D-8345) and the Data East version (520-5000-00) there are 3 caps that most likely cause problems with the 5VDC rail. On the WMS pcb it's C7, C8 & C10, and on the DE version they are C2, C3 & C4. I mention both of these PCB's because they are pretty much identical and this F14 actually has a DE PCB installed in the game! This is how the great F14 fire we've all come to know and love was actually caused in the first place, because the fuse locations and ratings on the DE PCB are completely different than the WMS which are printed inside the head! Let this be today's PSA.
A quick glance at the PCB revealed none of the caps had been replaced. Where this PCB is 30 years old, they needed to be done and along with it I removed the 1723 regulator IC as well given it's probably been stressed and is just cheap insurance to do so.
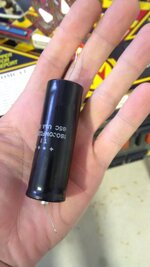
I installed a socket for the regulator, and replaced two of the 3 caps. I did this because the last one was a large 18,000uF axial cap which is pretty much NLA and only available at Great Plains Electronics because Ed has them custom made just for him. As such they are pricey @ $6 each, and I wasn't ordering anything from GPE anytime soon, so I thought I would see what happened by leaving it alone. I tossed the PCB back into the game and only connected the source voltage connectors and the GI so I could visually tell when the game was powered up. Initially the 5V rail came right up and looked solid with my DMM. I reconnected everything else, powered the game up again and voila everything seems good. Played a few games and no issues, so thought it was good to go... then just as I was about to shut it down the game went nuts again. UGH. Powered the game down and let it cool off a bit, connected my DMM to the 5V test point so I could see what was going on right away, power the game on and sure enough the 5V would come up to spec and then quickly start to fall off and just keep falling. At this point I knew I would have to deal with that 18,000uF cap. I tried testing for AC ripple across this cap before removing it, but it wasn't showing anything.

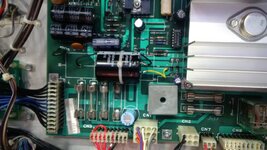
I pull the cap off the PCB, and started thinking about my options to replace this thing. Where axial caps are hard to come by at the best of times, and where GPE is having these custom made (they won't be available forever) I looked at my parts kit and realized that the standard WPC driver caps are pretty close in value @ 15,000uF. I don't recommend using different cap values (voltages are OK as long as they are higher than original) but where it's a pretty high cap value already and it's a simple circuit I felt it would be a decent candidate to try for this repair. The only other issue is they are radial. The nice thing about this PCB is the axial is so large that the factory zip tied the cap to the PCB, so I could do the same thing with the radial and just solder small wire leads between the cap and the PCB.

By doing this it saved me time, money and ensures I can get replacement parts for years to come instead of hoping GPE continues to MFG and stock the axial version. Power the game up, and probe the 5V rail.

Success! Game is rock solid once again, and has been running in attract mode for hours without an issue. This also means that I don't have to stock the 18,000uF cap for future repairs, I can simply use the radial WPC caps I have plenty of.
*QUICK UPDATE*
After doing all of the above the game only stayed stable for about 4 hours, and then the 5V started crashing again! My gut was telling me that the bridge rectifier was the culprit but the 5v source voltage is derrived from the 12V line, but where the +12v and -12v were both rock solid during the 5V crash my head was having a difficult time accepting what my gut was telling me. I finally caved and replaced the bridge and that has officially fixed the 5V issue once and for all. My guess is even though the bridge was testing good and the 12V / -12V lines seemed fine the bridge was failing under load. So in these instances when in doubt, change the bridge!
D
As some of you may know, I had a clients F-14 in my shop months ago with a sound issue. (Found HERE) Well, long story short soon after the client got the game back it started acting up again with other issues. As such he'd had enough of dealing with this game and cut it loose for something else. I now have it in my posession again to try and exercise the deamons!
I was told the game would power up and start, but would randomly start to freak out and make crazy noises, the display would be all messed up and the inserts would go crazy. He literally thought the game was possessed. Luckily it didn't take the game long to exhibit these characteristics once I got it all setup, and it actually started showing an IRQ error on the display. I figured it had to be something with the power supply, classic low voltage symptoms. Sure enough a quick probing of the power supply test points with my DMM revealed a 5V rail that was crashing! I think by the time I got the DMM on the test points it had fallen to just over 3VDC, and it got so bad the game actually blew the main line 4A fuse! All of the other voltages on the power supply were rock solid (+12VDC and -12VDC) so I knew I was only dealing with the 5V section.
Now, on the Bally / Williams version of the power supply (D-8345) and the Data East version (520-5000-00) there are 3 caps that most likely cause problems with the 5VDC rail. On the WMS pcb it's C7, C8 & C10, and on the DE version they are C2, C3 & C4. I mention both of these PCB's because they are pretty much identical and this F14 actually has a DE PCB installed in the game! This is how the great F14 fire we've all come to know and love was actually caused in the first place, because the fuse locations and ratings on the DE PCB are completely different than the WMS which are printed inside the head! Let this be today's PSA.
A quick glance at the PCB revealed none of the caps had been replaced. Where this PCB is 30 years old, they needed to be done and along with it I removed the 1723 regulator IC as well given it's probably been stressed and is just cheap insurance to do so.
I installed a socket for the regulator, and replaced two of the 3 caps. I did this because the last one was a large 18,000uF axial cap which is pretty much NLA and only available at Great Plains Electronics because Ed has them custom made just for him. As such they are pricey @ $6 each, and I wasn't ordering anything from GPE anytime soon, so I thought I would see what happened by leaving it alone. I tossed the PCB back into the game and only connected the source voltage connectors and the GI so I could visually tell when the game was powered up. Initially the 5V rail came right up and looked solid with my DMM. I reconnected everything else, powered the game up again and voila everything seems good. Played a few games and no issues, so thought it was good to go... then just as I was about to shut it down the game went nuts again. UGH. Powered the game down and let it cool off a bit, connected my DMM to the 5V test point so I could see what was going on right away, power the game on and sure enough the 5V would come up to spec and then quickly start to fall off and just keep falling. At this point I knew I would have to deal with that 18,000uF cap. I tried testing for AC ripple across this cap before removing it, but it wasn't showing anything.

I pull the cap off the PCB, and started thinking about my options to replace this thing. Where axial caps are hard to come by at the best of times, and where GPE is having these custom made (they won't be available forever) I looked at my parts kit and realized that the standard WPC driver caps are pretty close in value @ 15,000uF. I don't recommend using different cap values (voltages are OK as long as they are higher than original) but where it's a pretty high cap value already and it's a simple circuit I felt it would be a decent candidate to try for this repair. The only other issue is they are radial. The nice thing about this PCB is the axial is so large that the factory zip tied the cap to the PCB, so I could do the same thing with the radial and just solder small wire leads between the cap and the PCB.

By doing this it saved me time, money and ensures I can get replacement parts for years to come instead of hoping GPE continues to MFG and stock the axial version. Power the game up, and probe the 5V rail.

Success! Game is rock solid once again, and has been running in attract mode for hours without an issue. This also means that I don't have to stock the 18,000uF cap for future repairs, I can simply use the radial WPC caps I have plenty of.
*QUICK UPDATE*
After doing all of the above the game only stayed stable for about 4 hours, and then the 5V started crashing again! My gut was telling me that the bridge rectifier was the culprit but the 5v source voltage is derrived from the 12V line, but where the +12v and -12v were both rock solid during the 5V crash my head was having a difficult time accepting what my gut was telling me. I finally caved and replaced the bridge and that has officially fixed the 5V issue once and for all. My guess is even though the bridge was testing good and the 12V / -12V lines seemed fine the bridge was failing under load. So in these instances when in doubt, change the bridge!
D
Last edited:
