As some of you may recall I purchased my first pinball machine recently (and some of you got me going) but aside from it being in great shape, it came with the very important back glass in pieces. Many pieces, actually. At first I saw no recourse but to use my graphic skills to redo the art work and print it onto clear acrylic, a costly process that just wouldn't work as intended. After spending many hours redoing the graphic work I started to consider salvaging the original glass, an idea that hit me after I was experimenting with the 2 large pieces.
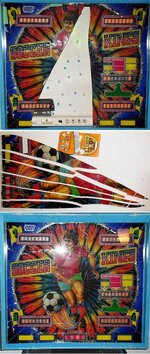
As seen in the pic it was good fortune that it broke in a way that gave me some hope something could be done. Thankfully the side pieces were broken in large chunks and stood by themselves on the cabinet. The problem was the middle portion, that was shattered in many pieces. So the thought was that if I could make the middle pieces stable enough to stand up in the cabinet, that it could work just fine (contrary to attempting to glue the entire thing as a single piece).
After much research I came across the ideal tape for the job, Gorilla transparent tape. Stuff is super strong and fairly thick (not at all your packing tape). Figured that since I had all the pieces that I could tape them all together and hope these would be stable enough to handle. Also knew that I had one shot at this, as the tape is so strong that attempting to remove it from the glass would result in the artwork coming out with it. Applied tape to the entire back side, cutting off excesses from the edges. Even wrapped the front for added stability, something I was hesitant to do as I didn't it to show. But as seen in the pic, that is hardly the case. As a result I had this middle portion standing up strong and clearly able to sit on the shelf on its own.
In order to open the cabinet I now have to remove the three pieces, instead of a heavy single one. Not a biggie and if anything, it is a safer seeing how I'm not handling a very heavy single plane of glass.
The downside: due to some of the tape wrapped around the middle pieces, the middle piece doesn't butt to its neighbour as close as I'd like. But again, this is hardly noticeable. It may not be a perfect alternative to a replacement back glass but seeing how these may be impossible to find, I'm pretty happy with the final result. Especially when you consider the $11 investment, a fraction of what I was prepared to spend experimenting with different print methods. Now we get to look at the (pretty?) artwork and not have to guess what all those flashing lights mean while looking at the white, blank backdrop.
The moral of the story: if you break your back glass don't trash it, tape it.