• We have upgaded to the latest version of XenForum and the process finished without any errors!!!! Enjoy the new forum!

Cabinet Replacement

Michael Drake

New Member
Feb 25, 2020
28
7
3
53
St. John’s NL
Hello All

I took the plunge and picked up my first dream Pin in near mint condition recently. Unfortunately it was damaged by the shipper.

Anyone know where I could source a single cabinet section for wide body and replacement decal?

Thanks in advance
 

Fleetwood mIkea

Active Member
Sep 13, 2017
369
131
43
Milton
Which pin? Any photos? It seems like replacing a section of the cabinet might be a bit drastic- any chance of repairing? Cutting/building the parts is relatively easy but putting it all back together won’t be fun. If you were closer I’d give it a shot NP.
Not a lot of single decals floating around though, again depending on the pin. You may end up having to buy a set.
PS- Welcome to PinRev.
 
  • Like
Reactions: Mike Walsh

Michael Drake

New Member
Feb 25, 2020
28
7
3
53
St. John’s NL
F7D16F97-75DA-4DFE-94C5-E5F6A1C46683.jpeg 8A4A5DEB-2161-4414-9D27-4D67D0632507.jpeg E178F726-B1AD-4EDA-BCA4-6E09A50499E7.jpeg Hi Mlkea

I appreciate the reply and advice.

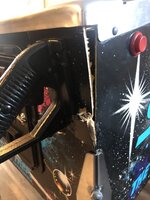
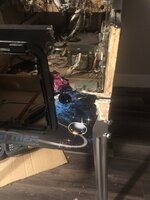
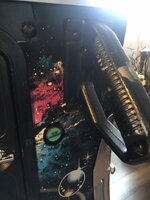
It was a mint STNG with a lot of sentimental value. Took a long time to get and to have it damaged so badly by shipper has left me gutted.

The seller went above to package it but it looks like the shipper stacked something on top when told not to or hit plunger handle somehow caving the handle and cabinet inward.

It was cracked through all the way around the gun handle so I removed the damaged section as carefully as possible and mostly intact to see if it can be repaired once splintered pieces out of way.

I was thinking a new front section and decal would be the path of least resistance with minimal reconnects to be made and make for a more desirable repair.

I might add I’m not that handy with woodworking so there’s that as well.
 

Michael Drake

New Member
Feb 25, 2020
28
7
3
53
St. John’s NL
I wish it would buff right out! I found VirtuaPin last night and left a voicemail with them today. Hope to hear back whether they can do the single section soon.

Thx again
 

Fleetwood mIkea

Active Member
Sep 13, 2017
369
131
43
Milton
Ouch!
That’s brutal - and especially bad that it had to happen to such a great pin. That section is easy enough to reproduce with the correct dimensions and I’d gladly take a stab at it, but if you’re not a woodworker or have no one to install it properly then you’re not much farther ahead. It’s not a long term solution by any means but you may be able to at least make a functional repair using the original pieces, or at least the large broken off chunk. I would put a thin piece of thin (1/8” or 1/4” marine ply) plywood between the coin door opening (remove the door) and the corner on the inside and glue/epoxy it in place. Then glue/epoxy the big piece (minus the handle of course) to the plywood, let it dry, bondo all of the cracks/spaces, then sand smooth and paint it black until you find a decal. I know that kinda glosses over the details but I think it’s totally doable.
 

Michael Drake

New Member
Feb 25, 2020
28
7
3
53
St. John’s NL
Ouch!
That’s brutal - and especially bad that it had to happen to such a great pin. That section is easy enough to reproduce with the correct dimensions and I’d gladly take a stab at it, but if you’re not a woodworker or have no one to install it properly then you’re not much farther ahead. It’s not a long term solution by any means but you may be able to at least make a functional repair using the original pieces, or at least the large broken off chunk. I would put a thin piece of thin (1/8” or 1/4” marine ply) plywood between the coin door opening (remove the door) and the corner on the inside and glue/epoxy it in place. Then glue/epoxy the big piece (minus the handle of course) to the plywood, let it dry, bondo all of the cracks/spaces, then sand smooth and paint it black until you find a decal. I know that kinda glosses over the details but I think it’s totally doable.
Thanks again for the great advice. Think I will try to source someone locally with quality carpentry skills to repair until I can replace section with new.
 

Mike Walsh

Active Member
Aug 12, 2017
297
94
28
62
C.B.S. , Newfoundland
Too bad you are not a little closer.
More hands make for light work.
Take your time and take lots of pictures. You'll get it done.
Good luck!
Great pin! I've been tempted many times to get one. I picked up the Stern Star Trek LE. You'll have to try it the next time you are in town.
 

Michael Drake

New Member
Feb 25, 2020
28
7
3
53
St. John’s NL
Thanks Mike; I could certainly use your expertise. I could deliver if you’re interested in a project :). Love to take you up on invite sometime soon. Let me know if/when you decide to move your Star Trek LE.
 
  • Like
Reactions: Mike Walsh

mwong168

Administrator
Staff member
Nov 14, 2012
6,688
1,463
113
46
Toronto
I know someone with access to high resolution print ready decals for STTNG. I have the head and front cab decals that were given to me by my good friend hassanchop few years ago who actually redrew them. If you need his contact let me know and he could probably have the front cab decal printed and sent to you.

2-27-20 1-11-38 PM.png

It is probably easier and cheaper to replace just the front then get a new cabinet to move all the stuff over.
 
  • Like
Reactions: Mike Walsh

Michael Drake

New Member
Feb 25, 2020
28
7
3
53
St. John’s NL
I know someone with access to high resolution print ready decals for STTNG. I have the head and front cab decals that were given to me by my good friend hassanchop few years ago who actually redrew them. If you need his contact let me know and he could probably have the front cab decal printed and sent to you.

View attachment 16277

It is probably easier and cheaper to replace just the front then get a new cabinet to move all the stuff over.
That would be greatly appreciated. Thank you!
 

Sbird

Member
Feb 21, 2017
39
15
8
58
Porters Lake NS
Sorry for the damage Michael - you may want to have a chat with your house insurance broker. I have confirmed with mine several times that my house insurance covers me for damage to pinball machines in transit. The transport company is tough going and as you stated they fall back on the compensation by the pound argument.
 

luch

Super Member
Nov 18, 2012
3,834
834
113
Newmarket
www.topl.ca
Sorry for the damage Michael - you may want to have a chat with your house insurance broker. I have confirmed with mine several times that my house insurance covers me for damage to pinball machines in transit. The transport company is tough going and as you stated they fall back on the compensation by the pound argument.
good idea , worth looking into
 

Michael Drake

New Member
Feb 25, 2020
28
7
3
53
St. John’s NL
That would be greatly appreciated. Thank you!
I know someone with access to high resolution print ready decals for STTNG. I have the head and front cab decals that were given to me by my good friend hassanchop few years ago who actually redrew them. If you need his contact let me know and he could probably have the front cab decal printed and sent to you.

View attachment 16277

It is probably easier and cheaper to replace just the front then get a new cabinet to move all the stuff over.

Hi again,
Would you have contact info for friend with print ready STNG decals?

Thank you!
 

Michael Drake

New Member
Feb 25, 2020
28
7
3
53
St. John’s NL
Ouch!
That’s brutal - and especially bad that it had to happen to such a great pin. That section is easy enough to reproduce with the correct dimensions and I’d gladly take a stab at it, but if you’re not a woodworker or have no one to install it properly then you’re not much farther ahead. It’s not a long term solution by any means but you may be able to at least make a functional repair using the original pieces, or at least the large broken off chunk. I would put a thin piece of thin (1/8” or 1/4” marine ply) plywood between the coin door opening (remove the door) and the corner on the inside and glue/epoxy it in place. Then glue/epoxy the big piece (minus the handle of course) to the plywood, let it dry, bondo all of the cracks/spaces, then sand smooth and paint it black until you find a decal. I know that kinda glosses over the details but I think it’s totally doable.
I have decided to have a cabinetmaker to replicate and replace damaged section. Any idea best paint to use? Acrylic spray?
 

Fleetwood mIkea

Active Member
Sep 13, 2017
369
131
43
Milton
I have decided to have a cabinetmaker to replicate and replace damaged section. Any idea best paint to use? Acrylic spray?

I’m probably not the best person to answer this, but if it’s only the one section and you paint it before installation on the cabinet then I would imagine standard Rustoleum (semi-gloss) spray paints could be used. If you were repainting only (as in stencilled art on older EMs) there are certain paints that are much better for that like Molotow. You could probably roll on Rusoleum paints as well if it’s installed as bare wood. Either way, remember to sand and smooth the wood first then prime, sand again then apply a few coats of paint. Make sure everything is super smooth before applying the decal, because any dust or debris will just get amplified by the decal. You will also want a shiny surface for better decal adhesion.

Make sure that your cabinetmaker actually sees and measures what you need done though. The corners are done with a mitre-lock style joint. It looks like the one on the damaged side is fine but you’ll need to make sure you can separate the joint on the other side as well, then clean both joints before attaching the new panel. You may need a polyurethane style glue because it’s going to be impossible to get all of the old glue out of the old joints. Hopefully your fabricator can handle the install as well.
Wish you were closer- I’d love to take a crack at this!
 
  • Like
Reactions: Mike Walsh