• We have upgaded to the latest version of XenForum and the process finished without any errors!!!! Enjoy the new forum!

CV: Bad switch matrix issues (WPC 95)

good_buddy83

Active Member
Dec 19, 2012
207
49
28
Beamsville
Hey Team,

I'm getting a bit frustrated with my CV switch matrix and I am hoping someone smarter than I has run into a similar issue:

Symptoms:

Game boots up OK.
I get an error message that reads: check fuses F101 and F109, J127 and opto 12V Supply.

-All of the cabinet switches work just fine.
-I can go into the diagnostic menu and switch edges test. Some switches test fine. Other cause the row to ground fault (rows 5, 6 & 1 mostly). Sometimes switches seem to randomly come on and off, or pulse on and off. This can happen with the machine turned on and no one touching it.
- Swapped out the socketed U20 chip, thinking that could be it. It changed things a bit, got rid of one row fault (row 2 used to always be all switches closed), even with J-206 to J-209 disconnected. Now just switch 24 (always closed) is closed at the start of the switch matrix test...But I feel like I am close.
-Also, the ball trough is non responsive. Weird.
-I have metered out 12.07V at the 12V test point on the board. On the playfield opto board, this is up to 12.7V. I think this is normal.

Here's what really bugs me. This is a new Rottendog CPU board. The old CPU board was pooched, This one worked great for a month and then this happened.

I'm guessing U18 & U19 on the board next, but I don't want to butcher a new board if that is not actually the issue.

I feel like something shorted out the Matrix before and might do it again, even if I get it repaired.

Also, I've noted a lot of heat distortion on the big diodes on the Power board (I think these replaced the old rectifiers). I don't think this is related, since I can meter out 12V, but not certain.

I appreciate any help or guidance on this one.
 

good_buddy83

Active Member
Dec 19, 2012
207
49
28
Beamsville
I think I may have found the solution. Spoiler alert...... the culprit is a fuse!!!!

0.63mA fuse for the +12V to the CPU to be more precise. While the +12V tested fine from the test point (little knob on the board), it goes through the fuse before it hits a the connector. When I measure voltage at the connector it was close to +14V!!! The fuse is located close to a large heat sink and I suspect the heat weakened the fuse causing some resistance, but the fuse did not break! When I used a continuity test, it shows fine. When I test for resistance it is high! Looking at the fuse more closely (remember these are the little WPC-95 fuses) there is some brown discoloration hidden under the metal end. This may be my smoking gun, and is now replaced.

I noticed the big diodes that rectify the +12V are showing signs of high heat. While I know I am getting 12.06 volts, I will replace the stressed diodes since the board is out. Hopefully this will bullet proof it for years to come.

I will also need to replace the socket ULN2803A IC again as well. Finger crossed, but I think that may just fix my switch matrix issues. When I replaced this ic prior, things appeared to be fine, for a short while, then things fell apart. I suspect the matrix went wonky when the IC started to fail due to the +14V, not the +12V it was designed for.

Not much else left it could be. Please let me know if any of this sounds incorrect or if there is something else I may be missing. Thought I would share incase anyone comes across this in the future, as I had not seen this before.
 

ToMMy

Member
Dec 18, 2018
32
23
8
Orillia, ON
The ULN2803A can safely handle up to 50 VDC so I wouldn't be too concerned about that.
They generally only pop when one (or more) of the switch matrix outputs makes unintentional contact with a Solenoid +V line.
 
  • Like
Reactions: MrMikeman

good_buddy83

Active Member
Dec 19, 2012
207
49
28
Beamsville
Well shit, perhaps there is a short somewhere on the playfield then.

Yes, I meant 0.63A fuse.

Didn't realize the switch ULN2803A could take that much.

Sounds to me like I need to find the 50V short, that is the only thing that seems to make sense. I'll get power board back in the game and start again to see what I can figure out.
 

good_buddy83

Active Member
Dec 19, 2012
207
49
28
Beamsville
So I replaced the ULN2803A again. Fuse is replaced, and a rebuilt the diodes.

I am getting a proper +12.07V going to the cpu board (measured at J-210). I am still getting +13.7V at J-139 and J-140. So there is a bit too much going to the playfield opto boards, but I don't think it is enough to be causing the issues.

So far I have only hooked-up two connectors to the cpu switch matrix (J-207 and J-209) for the row and column to the backbox switch. This works fine in test menu. row-1 column one is good, no issues. Also dedicated switches are still good too (they were always OK).

My thinking is before I hook up J-206 and J208 to the cpu board, I want to disconnect the playfield boards. To me, all signs are pointing to a +50V short on the playfield (unless you guys think I am missing something). My thoughts are to systematically hook swithches up to matrix to sniff out where the issues start to happen.

Also, is there a good way to test each switch on the matrix, while leaving the playfield disconnected? I seem to remember this procedure somewhere where you use a diode and connect rows to columns to test the matrix first. I would love to be able to rule out a CPU board issue in order to focus efforts on the playfield.

Let me know your thoughts and whether or not I'm back on the right track. Thanks!
 

Jim Wilks

New Member
Jun 19, 2016
27
7
3
Carlisle, Ontario, Canada
Your planned tests sound good. A 50V short to the switch matrix is a definite possibility. Keep the 50V off the playfield for now.

Yes, you can test the switch matrix with a simple diode connected to 2 wires. This is a great way to confirm CPU board is OK. The other way is to put the CPU board in another game.
 

good_buddy83

Active Member
Dec 19, 2012
207
49
28
Beamsville
OK, so a little update.

Today I had some time for testing. With the connectors removed, I connected a jumper to each row/column to the connector pin. Turns out that column 3 and column 7 do not function properly. If any of those switches are triggered it appears to short the entire column (ie, all the switches activate).

So I know the problem is now on the board, since the playfield was completely isolated for the test. I know I have a good +12.07V signal to the board. I already replaced the socketed ULN 2803 chip. Should I assume a LM339 is the next culprit? If so, which one and is there any way to test this before I de-solder? Any chance it is a simpler component (like a capacitor) that could have failed?

I appreciate any feedback!
 

Jim Wilks

New Member
Jun 19, 2016
27
7
3
Carlisle, Ontario, Canada
Good progress.

Sorry, but a simple component like a capacitor will not cause your symptoms. Look at the WPC circuit schematic and see which LM339 needs to be replaced. Make sure you socket them.
 

good_buddy83

Active Member
Dec 19, 2012
207
49
28
Beamsville
I pulled the schematic and read a bit more. Looks like the U23 chip failed when U20 failed. This is 74HC237. It has to be this IC, as it is the only other item upstream that controls the columns in the matrix.

Time to break out the soldering iron. I will be smart and solder in a socket and buy two 74HC237 ICs, because I still don't know what caused the damn short in the first place. I think this kind of damaged can only be caused by +50V straight to the heart.

I think I'm on the right track now.
 

good_buddy83

Active Member
Dec 19, 2012
207
49
28
Beamsville
Socketed the 74HC237. replaced the IC and everything worked! success........for about 10 games. Then poof! back to square one. Same symptoms, column 3 and 7 now fail. I had a good look at the playfield and could not locate any shorts. I want to blame the IR optical board, but I don't really know why, other than running out of things to blame. The board looks to be in good shape. I know 13.7 volts is going into the the board (more than +12V), but I can't see that causing the issue. Should I change the cap on this board? If just guessing now. But it is hard to play a game without this board plugged in as it controls the ball trough. Somehow the switch matrix is frying on a regular basis and I wish I could find out why. Anything systematic to try?
 

Jim Wilks

New Member
Jun 19, 2016
27
7
3
Carlisle, Ontario, Canada
Whenever I have intermittent switch matrix stuff like this, I spend a lot of time just looking at the back of the playfield. See what is close to switch terminals and might touch what it shouldn't. Particular attention to the switches in the row/column that fails.

13.7V is fine for the switch matrix.

Get another IR optical board from another game and test with it for a while.
 

good_buddy83

Active Member
Dec 19, 2012
207
49
28
Beamsville
Whenever I have intermittent switch matrix stuff like this, I spend a lot of time just looking at the back of the playfield. See what is close to switch terminals and might touch what it shouldn't. Particular attention to the switches in the row/column that fails.

13.7V is fine for the switch matrix.

Get another IR optical board from another game and test with it for a while.
Oh man, I am getting so close I can taste it!!!! I turned off the ring master in the software, suspecting the flasher/magnet/switch wiring could be getting pinched or shorted (impossible to see without disassembling the head). I replaced both ICs again, go everything working and have played several games on it every day for 3 weeks. switch matrix is still good!!! The issue is now isolated to the Ringmaster, something is shorting out the switch matrix in that head. I'm going to pull that head apart and have a good look. The motor board seems to be OK and works fine without issue. Might be the toughest fix I have ever encountered, but feeling confident that I am finally sniffing in the right area!
 

good_buddy83

Active Member
Dec 19, 2012
207
49
28
Beamsville
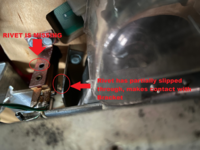
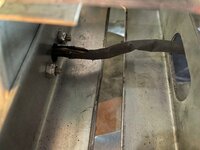
Issue solved!!! I wanted to share this for the group incase it comes up elsewhere. Believe it or not, broken rivet on the stand up target! This fell half way out in such a way that it made contact (only during a hectic game of course) with the ringmaster bracket. The wires going to the ringmaster head were starting to wear too. The magnet (although working) shorted back to the bracket when the head moved up just right, which shorted back through the stand-up target to the switch matrix.

Replace the switch, replace the wires. Problem gone.....except I think I stripped the gears in the motor taking the head off. Uggh!!! So close.

Thought this was worth sharing as this was a really tough one, that started out with a flakey switch matrix that turned out to be two unique problems in one. Probably one of the toughest issues I have ever encountered.
 

Attachments

  • CV switch missing rivet.png
    CV switch missing rivet.png
    958.9 KB · Views: 9
  • CV wire break.jpg
    CV wire break.jpg
    118.1 KB · Views: 8

Jim Wilks

New Member
Jun 19, 2016
27
7
3
Carlisle, Ontario, Canada
Issue solved!!! I wanted to share this for the group incase it comes up elsewhere. Believe it or not, broken rivet on the stand up target! This fell half way out in such a way that it made contact (only during a hectic game of course) with the ringmaster bracket. The wires going to the ringmaster head were starting to wear too. The magnet (although working) shorted back to the bracket when the head moved up just right, which shorted back through the stand-up target to the switch matrix.

Replace the switch, replace the wires. Problem gone.....except I think I stripped the gears in the motor taking the head off. Uggh!!! So close.

Thought this was worth sharing as this was a really tough one, that started out with a flakey switch matrix that turned out to be two unique problems in one. Probably one of the toughest issues I have ever encountered.
Nicely done -- See how a bit of detective work gets you to the end.
 
  • Like
Reactions: good_buddy83