• We have upgaded to the latest version of XenForum and the process finished without any errors!!!! Enjoy the new forum!

New Spike under cabinet lights

Luckydogg420

Member
May 12, 2013
825
24
18
Kitchener
I’d just like to share my new mod for GOT (well any spike game) this is an under cabinet led kit that will change colour with the button on the lockdown bar. So when multiple players use different houses in a game, the machine will glow a different colour to represent you.

A big thanks to Allibaster for helping me by double check my work before I plugged anything in. I was pretty hesitant doing this on my own with my limited knowledge in electrical design. Nothing is permanent, its easy to remove. it’s essentially a “Y” jack that comes out of the cabinet node board and connects from the lockdown bar’s button to an led amp that runs a rgb 12v strip. The 12v power comes from the bill acceptor header and has a fuse inline just in case.

If anyone is interested in doing this mod let me know. I’ll show you hows it’s done. I might also make a couple kits up if there’s enough interest.
 

Luckydogg420

Member
May 12, 2013
825
24
18
Kitchener
Bump for the Sunday crowd.

Are there any other New Spike games that utilize the button with different colours like GoT does. I’m curious what other games this would be useful on.

Are there any critiques that people have? I’d like some feedback, good or bad.
 

mwong168

Administrator
Staff member
Nov 14, 2012
6,681
1,450
113
46
Toronto
I think it looks great and why don't you post up how you wired everything up in your game.
 

Luckydogg420

Member
May 12, 2013
825
24
18
Kitchener
I’d like to thank Allibaster on pinside again for his help with developing this idea.

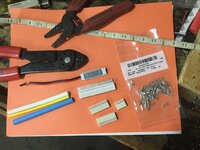
Things you need.

Soldering iron and solder.
Wire
Heat shrink
Wire cutters and exacto knife
5050 RGB light strip
RGB Amp.
1A in-line fuse
2X .100” 12 pin connector
.100” 6 pin connector
.100” Z connector
Lots of pins.


https://www.greatplainselectronics.com/proddetail.asp?prod=CP100-12-LR
https://www.greatplainselectronics.com/proddetail.asp?prod=CP100-06-LR
https://www.greatplainselectronics.com/proddetail.asp?prod=MWWS100-2236
https://www.greatplainselectronics.com/proddetail.asp?prod=08-50-0114

F10BD006-C7BE-47EC-A953-9F409ED354BC.jpeg
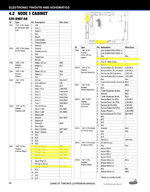
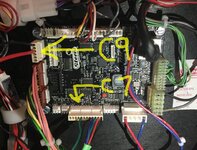
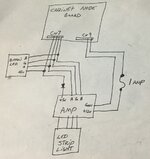
We’re going to make a “Y” jack for the cabinet node board’s connector C7 this controls the lockdown bar button and light. We’re also going to connect power to the dollar bill acceptor header C9 to get the 12v that we need.
C2EF0566-FCBC-4DA1-A74A-C47B64EACBAB.jpeg
5D933AE2-927C-4337-843F-2E8B2B03A9A4.jpeg
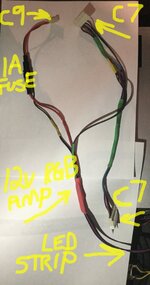
The original C7 connector in the game will plug into one side of our new “Y” jack through the “Z” connector. The other side of the “Y” jack will run into the RGB amplifier. Make sure to solder the wires at each connection and into each pin. Cover all of the connections in heat shrink.

Pay attention to the wire order in the C7 connector, because it is a different order then an RGB strip. On the 12pin connector pin#1 is the led +5v, pin#2-4 are RGB signal, and pins #5 + #8 are the button switch wires.

Connector C9 only needs 2 wires, pin# 4+6 for 12v and ground. This runs into the 1A fuse and then into the RGB amplifier.

I pulled the cover off of the RGB amp exposing the circuit board so that I could solder the wires directly onto the pads, rather then plugging things together. Make sure to cover everything again in heat shrink so that it doesn’t short out.
6201DC3E-170A-44F4-B567-D8DA96EF59A3.jpeg
The wire diagram looks like this.
0D2B1296-BB17-4770-8827-773B042B6268.jpeg
I ran the wire out from the RGB amplifier under the cabinet speaker, so that no drilling is required. To solder onto the light strip you will need to cut back the rubber weatherproofing on the seam that you cut it on. My 5050 LED light strip is divided into 3 sections that are separated by about 2’ of wire between each one. The first section is about 16” long and placed along the front of the cabinet about 6” back. The second section is about 20” and runs under the cabinet down the center toward the back. The third section runs up the center of the backbox and is about 20” long.


As long as you don’t exceed the power output of the dollar bill acceptor, then you could also add in RGB lights for the flipper buttons or speakers grills to match.
 
Last edited:
  • Like
Reactions: mwong168

mwong168

Administrator
Staff member
Nov 14, 2012
6,681
1,450
113
46
Toronto
Thanks for sharing and hope this helps others out who own a GOT or maybe use this for their other Sterns that use same board set and fire button.
 

Luckydogg420

Member
May 12, 2013
825
24
18
Kitchener
This should work for any spike game. I was looking at the GotG manual an it’s hooked up the same way. I haven’t played that game yet but I was told that the button changes colour depending on the mode your in like GoT.

It would also be possible to split the wires after the RGB amp and run lights to the flipper buttons and to the speaker grill lights if you had them.