• We have upgaded to the latest version of XenForum and the process finished without any errors!!!! Enjoy the new forum!

PB Customs' Whacky Mod Hacktorium!

pinball.customs

New Member
Apr 8, 2014
29
0
1
GTA
Blogs seem to be the latest craze in the hobby, so I figured I'd start my own here! :D

I wasn't sure how to proceed since I thought my blog stories would be short, boring and monotonous.. pretty much containing the same phrases over and over again. "Today: Made mongols." or "Today: Made shooters"

Then I thought, why not document the process of creating a mod from start to finish? I figured at the very least a lot of you will gain a new appreciation and insight as to how these things are made, the thought process involved, and sometimes the trials and tribulations to make it right. There will be some success stories, and some failed attempts. Not everything I make is marketable, and in some cases I just do it for the love of the craft.

And here we are.

First up...
 

quarter grabber

Active Member
May 29, 2013
514
49
28
Ottawa
I can't wait to see the entire process on your shooter rod mods, from idea conception to shipping. I think it will give us a new appreciation on how little you charge for these vs. the work involved to make them. Thanks for doing this :)
 

pinball.customs

New Member
Apr 8, 2014
29
0
1
GTA
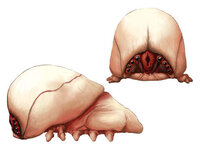
Starship Troopers - Brain Bug Shooter Rod

Now, let me start off by saying creativity sometimes strikes on the weirdest titles, for the strangest reasons. This is no exception, except for the fact that I was reading about someone's SST on Pinside and thought "You know, I want to make a shooter for that game". I mean it is one of my favourite games... great flow, AMAZING light show, almost Galaxian-like ruleset.

With that being said I generally like to make my shooters as a creature or bust from the theme in question. I also like to keep some sort of ergonomic form factor to my shooters. I don't like too many jagged, pokey edges when I'm trying to plunge the ball. It has to "feel right". After considering all this, I decided on the Brain Bug.


The material I use to sculpt the majority of my products is called MONSTER CLAY. It's used primarily in the film industry for sculpting maquettes, prosthetics, etc. It goes soft when warmed, even to the point of a paintable liquid if heated enough, and cools to a density that is great for mold-making.

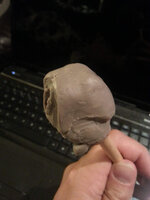
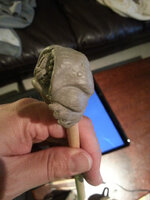
And so I begin by creating the basic form.


Now before you say anything, YES ... I know it looks like a penis head with a vagina mouth. But bear with me here..
 

Attachments

  • 1.jpg
    1.jpg
    16.1 KB · Views: 178
  • LR-starship_troopers_brain_bug.jpg
    LR-starship_troopers_brain_bug.jpg
    28.4 KB · Views: 179
  • 2.jpg
    2.jpg
    349.4 KB · Views: 176

pinball.customs

New Member
Apr 8, 2014
29
0
1
GTA
Now that everyone's mind is in the gutter, let's move on. :D

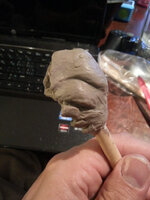
Once I get the basic shape done and the "vision" in mind, I BREAK the golden rule of sculpting -- I only sculpt one side. This is a faux pas in the sculpting world for a number of reasons, but I'm working on such a small scale here that I don't mind. I like to see where my vision is headed before I give full attention to the rest of the sculpt. Besides, when have you ever known me to follow the rules? :D That said, I begin adding and removing little pieces of clay using my fingers and various sculpting tools in my kit. In the pic below you can see I also "draw" a few lines to give it some depth and detail, which will be more evident in the painting stage. The thing to keep in mind when sculpting, EVERYTHING will be captured by the silicone mold. This includes things you don't want, like finger prints :x For those I use a light flaming tool to very gently melt them away.


and about 3 hours into the process, slowly adding, subtracting, smoothing, and we end up with a lot more detail. In the picture below you can see, NOW we're getting somewhere!


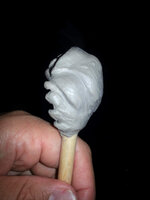
And below you can see I've created more detail in the face, adding eyeballs and mandibles, and making my way to the other side of the sculpt. From there I work to make the new side match the old side -- while of course adding a bit of uniqueness to it. After all, nothing is truly symmetrical. :)


Finally something I'm happy with! Although honestly I'm a bit of a perfectionist and could work on this sculpt for many hours more, but at some point I need to call it quits and move on.

Now ready for mold-making!
 

Attachments

  • 3.jpg
    3.jpg
    435.1 KB · Views: 140
  • 5.jpg
    5.jpg
    230 KB · Views: 131
  • 4.jpg
    4.jpg
    440.3 KB · Views: 130