• We have upgaded to the latest version of XenForum and the process finished without any errors!!!! Enjoy the new forum!

Solar Ride posts

azsiros

New Member
Dec 9, 2021
19
3
3
69
Ancaster, Ontario
I'm restoring a Solar Ride game, took off all the posts to clean and realized that 2 of them are taller than the other 27.
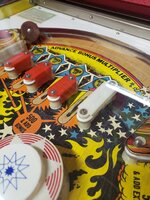
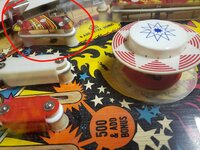
This should be an easy solution but I'm not exactly sure where these 2 taller posts go. From what I can tell from my photos it looks like they would go with the white plastic guiderail which is located just to the right of the three red plastic guide rails at the top of the playfield. Can anyone confirm the location of these taller posts?
 

Jaraplus519

Member
Dec 9, 2021
43
38
18
London, ON
I'm restoring a Solar Ride game, took off all the posts to clean and realized that 2 of them are taller than the other 27.
This should be an easy solution but I'm not exactly sure where these 2 taller posts go. From what I can tell from my photos it looks like they would go with the white plastic guiderail which is located just to the right of the three red plastic guide rails at the top of the playfield. Can anyone confirm the location of these taller posts?
Is this where you are referring to, sorry still a bit new to all of this.

Let me know if I can help mines currently all together until my LEDs get here.
 

Attachments

  • 20220111_181106.jpg
    20220111_181106.jpg
    174.8 KB · Views: 8

azsiros

New Member
Dec 9, 2021
19
3
3
69
Ancaster, Ontario
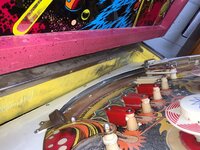
I did some more investigating myself and it looks to me like the taller ones might be for the rollunder bar just to the right of what you have circled.
I took a lot of photos before I took it apart but didn't realize how hard it is to tell the details like the post sizes from the pictures.
I only have 2 posts that are taller than the rest and these are 1 3/16" high. How many of the larger posts are on yours and can you confirm where they are? The first photo that I'm attaching here makes me think that the posts go on this rollunder. I'd be interested in hearing how your repair/restore went. Do you need to make any changes to the boards when you switch to led bulbs or can you just swap them in? Also, if you notice the paint on my back door it has some black specs all over it. Not sure if it's meant to be that way or not. Is yours like this?
(You're local to me as well! I have relatives that live in London and I only live an hour away).
 

Attachments

  • IMG_0157.jpg
    IMG_0157.jpg
    153.2 KB · Views: 7
  • IMG_0159.jpg
    IMG_0159.jpg
    96.9 KB · Views: 11

Jaraplus519

Member
Dec 9, 2021
43
38
18
London, ON
I did some more investigating myself and it looks to me like the taller ones might be for the rollunder bar just to the right of what you have circled.
I took a lot of photos before I took it apart but didn't realize how hard it is to tell the details like the post sizes from the pictures.
I only have 2 posts that are taller than the rest and these are 1 3/16" high. How many of the larger posts are on yours and can you confirm where they are? The first photo that I'm attaching here makes me think that the posts go on this rollunder. I'd be interested in hearing how your repair/restore went. Do you need to make any changes to the boards when you switch to led bulbs or can you just swap them in? Also, if you notice the paint on my back door it has some black specs all over it. Not sure if it's meant to be that way or not. Is yours like this?
(You're local to me as well! I have relatives that live in London and I only live an hour away).
So I took a closer look and you are correct, they appear to be for the rollunder bar, those 2 posts are clearly different in size and shape at the top.

As for mine, the machine is in great working order and a lot of the major system 1 stuff had already been done, new battery, connectors all re pined, ground mods are done, and the sound board was rebuilt. So I wouldn't call what I am doing a restore, more of a refresh, I am not going to strip everything down like you did, I'm just going to replace rubbers, change out the bulbs for LED, and clean it up a bit. I don't believe anything extra is needed to swap the bulbs out, the previous owner already has some LED's in there, looks like any time an incandescent went out they replaced it with a LED.

For the paint on the back box, mine is the same pinkish purple color with a black speckle.

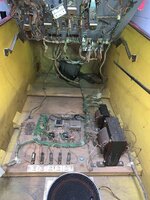
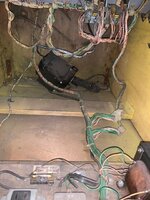
1 question, what is the large black transformer looking thing at the back of the cabinet in your second pic, mine does not have that.

That's cool you're from the area, London and surrounding area seems to have a lot of Pinball folks.
 

azsiros

New Member
Dec 9, 2021
19
3
3
69
Ancaster, Ontario
Thanks for the info, I just might look at replacing all my bulbs with led as long as I don't have to do any other changes. I have an Evel Knievel pinball and I thought you had to change the (mpu?) board in order to use led's but I could be wrong. I have no idea what that transformer is for at the back. I thought they all had this? It seems like it was mounted vertically at the very back wall but has come loose and fallen. I'll take a closer look to see what's up with that. I had to order a new power supply and all the rubbers off eBay. There is a place in town called Pinball Exchange that helped me with parts and advice on my Evel Knievel game but they don't have any parts for Solar Ride so had to get them through eBay. Do you know of any other businesses in south western Ontario that repairs or supplies parts for pinball? I prefer to give the local places my business if possible. Not sure if you've checked Youtube but there are some good videos on Solar Ride that have helped me out, here's a couple of links...
 

Jaraplus519

Member
Dec 9, 2021
43
38
18
London, ON
Thanks for the info, I just might look at replacing all my bulbs with led as long as I don't have to do any other changes. I have an Evel Knievel pinball and I thought you had to change the (mpu?) board in order to use led's but I could be wrong. I have no idea what that transformer is for at the back. I thought they all had this? It seems like it was mounted vertically at the very back wall but has come loose and fallen. I'll take a closer look to see what's up with that. I had to order a new power supply and all the rubbers off eBay. There is a place in town called Pinball Exchange that helped me with parts and advice on my Evel Knievel game but they don't have any parts for Solar Ride so had to get them through eBay. Do you know of any other businesses in south western Ontario that repairs or supplies parts for pinball? I prefer to give the local places my business if possible. Not sure if you've checked Youtube but there are some good videos on Solar Ride that have helped me out, here's a couple of links...
No problem, glad to help a fellow pinball enthusiast, like I mentioned a lot of this is very new to me still, but always happy to help where I can, it's what keeps a community like this together.

I have read on some machines you do need to make changes for LED's, so your Evil Knievel very well could need a new MPU in order to correctly drive the LED's, I'd have to look into it more.

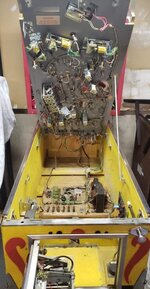
I attached a picture of the inside of mine, not transformer in the back.

I have not heard of Pinball Exchange, again still learning the ins and outs of this hobby and finding the local guys. I know there is a guy in London who is supposed to be the go to repair guy, Corey Cooke Pinball, I've been meaning to give him a call just for an introduction, thanks for the reminder :)

I ordered all of my stuff recently from "Marco Specialties Pinball" out of the USA, but the shipment is delayed because of a Covid outbreak at the Memphis TN sorting facility.

I have watched those videos a few times, lots of good info in there, here is another great resource http://www.pinrepair.com/sys1/
 

Attachments

  • received_297019295799088.jpeg
    received_297019295799088.jpeg
    62 KB · Views: 4

Jaraplus519

Member
Dec 9, 2021
43
38
18
London, ON
This is from Marco on their LED kit.

"Bally and Stern SEI pinball machines built from 1977 through 1985 that use the 6800 microprocessor MPU system may require an anti-flicker or anti-strobing kit, Alltek Ultimate Lamp Driver board or a resistor modification to minimize 'ghosting' (constant low illumination of switched LEDs)."
 

azsiros

New Member
Dec 9, 2021
19
3
3
69
Ancaster, Ontario
Good to know, I'll look into the led's on the Solar Ride a bit more then. Looks like the line cord is plugged directly into that transformer at back so it's in line with the power, maybe it's used as some kind of voltage filter. Your machine looks a lot cleaner than mine. I'll check out your contacts as well, good to know all the sources in your area.h
 

Attachments

  • IMG_0292.jpg
    IMG_0292.jpg
    84.3 KB · Views: 4
  • Like
Reactions: Jaraplus519

azsiros

New Member
Dec 9, 2021
19
3
3
69
Ancaster, Ontario
Ok, the only disadvantage of having it there is the weight, it's a big transformer and must be 40lbs or so, but wonder why they would put it there in the first place?
 

luch

Super Member
Nov 18, 2012
3,801
822
113
Newmarket
www.topl.ca
it was something the canadian gov mandated , due to most houses back in the day had no ground pin on the outlets , so people would break off the ground prong on the plug , now you don't have a ground and there was a possiblity of getting an electric shock if you touched the games side rails , therefore you became the ground .
 
Last edited:
  • Like
Reactions: Jaraplus519

azsiros

New Member
Dec 9, 2021
19
3
3
69
Ancaster, Ontario
Ok thanks.
Now I'm on to the next steps, A few questions - (being new to these forums I'm not sure if I should be starting a new topic, but here goes..)..
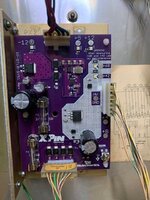
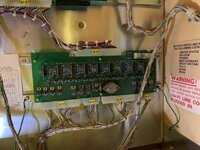
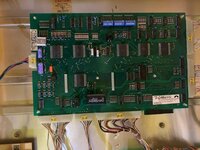
1. Ground wires - any chance I can get confirmation as to where the ground wire modifications go? I don't have the ground mods on mine and a lot of the info I found on this refer to System 80, not System 1 which I believe this is. My new power supply has a ground screw on the bottom right corner so that's pretty obvious to run a wire from this to the back metal panel. As for the main MPU board I found you can connect it to the A1J4-1 terminal or the negative lead of the C16 capacitor. For the Driver board it looks like the negative lead of the C1 capacitor (on top right of board) might be the location. Is this correct?
2. I got everything back together, powered up and tried it out, first issue I saw was the solenoid for the drop targets doesn't seem to have enough reach to reset the targets. For example, when targets are down and a new game is started, it should raise all the targets and be ready for the new game. I see the solenoid activating and pushing the targets up but it doesn't quite get to the point where they latch back up. Looks like it should be an easy adjustment - does anyone know how to fix this?
3. While testing in out, after a minute or so of playing all of a sudden the flippers stopped working and the score displays blanked out. I powered off and on again and all was ok. I don't really know all that stopped working but don't want to try it again until I put the grounds in place.
Other than these issues and a couple minor switch adjustments, it's looking pretty good.
 

Attachments

  • Power-Supply-New.jpg
    Power-Supply-New.jpg
    82.5 KB · Views: 2
  • Driver-Board.jpg
    Driver-Board.jpg
    132.5 KB · Views: 2
  • MPU-Board.jpg
    MPU-Board.jpg
    136.8 KB · Views: 2