• We have upgaded to the latest version of XenForum and the process finished without any errors!!!! Enjoy the new forum!

spiroagnew's Six Million Dollar Project

spiroagnew

Well-Known Member
Staff member
Dec 1, 2012
1,334
311
83
Scotch Block, ON
www.creditdotpinball.com
My Pinball Pimp stencil set arrived the other day. Jeff Miller was easy to deal with, and upon first look at his product it appears to be head and shoulders above the competition. It came with detailed instructions and built-in safeguards to minimize accidents by end-users.
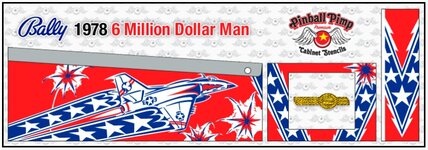
000-pins2.jpg

I was familiar with Jeff as I had interviewed him in the past, so I was able to swing a bulk deal on a handful of stencils, and saved a bit of cash. I would normally cut my own stencils for this kind of project, but the Bally stencil is pretty intricate and has a much more clean look than their Gottlieb counterparts (whose factory cabinets look sloppy in comparison) so stick-on stencils were the way to go here. It will also give me a chance to review the product and make sure all the praise from fellow collectors is warranted (it probably is). I'll *try* to squeeze in this project before I start painting cabs for the rest of the community...
 

spiroagnew

Well-Known Member
Staff member
Dec 1, 2012
1,334
311
83
Scotch Block, ON
www.creditdotpinball.com
Did some of the un-sexy work this afternoon. I got all the underside mechs wired back in after cleaning, save for the pop bumpers. I installed the new drop targets from Pinball Resource. I was missing a barrel link, those dumb little pieces that link the drop to the swing arms, but thankfully, Drano had a bunch kicking around from his Fathom build.

Flippers mechs were also rebuilt with a PBR kit. I went with the complete kit, and it was a good choice...most of what was there was in pretty rough shape. I may get to the pops tonight. All the parts are clean and ready to go. Can't wait to get to the topside!

f8f7dc28533b8ab9eca49b22df4012e8.jpg
 

Attachments

  • uploadfromtaptalk1454623570280.jpg
    uploadfromtaptalk1454623570280.jpg
    48.5 KB · Views: 44
  • Like
Reactions: WARLOCK

spiroagnew

Well-Known Member
Staff member
Dec 1, 2012
1,334
311
83
Scotch Block, ON
www.creditdotpinball.com
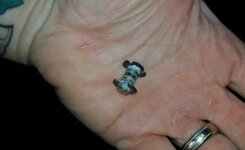
With the playfield nearly taken care of, I'm working on stripping the cabinet...with my fingers crossed that the weather will turn soon and I can get painting. I removed all the hardware, including the coin door, this afternoon. Since I'll be filling and sanding the cabinet anyhow, saving the siderails from damage when removing them is of the utmost importance. The best method I've tried is drilling off the head of the nail. I first punch a guide divot in the middle of the nail head with an awl. This way, the chance of the drill straying off course is lessened. I use about a 1/8 drill bit-- enough to take the head off but leaving enough attached to the body of the nail to grip for extraction.

f20087f334039afa3fd200be1434779f.jpg


Once all the heads have been drilled out and the side rail is removed, I'll take the awl and gently drive it in on either side of each nail so I get a bit of wiggle room. Wiggling and turning counter-clockwise away from the spiral using a pair of needle nose pliers should get the nail out without too much trouble and with minimal damage.

d9b77ef60b4c3132cec25fcc9053118e.jpg


Since new nails need to be driven in these same holes when the stenciling is finished, I fill the holes with wooden skewers and a bit of wood glue, along with some JB Weld Kwik Wood to even out the surface. Pinball Resource offers period correct spiral side rail nails, but you may be able to locate them at your local hardware store. I haven't, so I've ordered from PBR in bulk.

I'll be re-pinning some connectors, both .156 and .100, until the weather gets better and I can sand and paint.
 
Last edited:
  • Like
Reactions: WARLOCK

spiroagnew

Well-Known Member
Staff member
Dec 1, 2012
1,334
311
83
Scotch Block, ON
www.creditdotpinball.com
Much like an exotic dancer in Sudbury, I braved the frigid temperatures today to do some stripping. I got the head completely bare and filled with Bondo/JB Weld where necessary. It wasn't too beat up so filling went quick. I decided to fill over the stamped serial numbers on the cabinet, which makes me very sad, given my love for pinball serials and the information they provide. The inner cabinet tag still exists on this game so it's numerical data will live on. If I can catch a couple of really mild days I'm hoping I can prime and paint the head, ahead of the rest of the cabinet...just so I can start reassembling something now that the playfield is complete.

000-pins96.jpg 000-pins97.jpg
 

Seven

Active Member
Oct 6, 2015
255
150
43
57
Prince Edward Island
www.pinballorama.com
It's coming along. The playfield looks great.

I'm going to have to tackle a full cabinet spray on Pinbot and Road Kings - Pinbot first because I have a stencil set for it. I've not been looking forward to removing the metal. Good to know about the nails. I'm building an order of stuff from PBR so I'll put that on my list.
 

spiroagnew

Well-Known Member
Staff member
Dec 1, 2012
1,334
311
83
Scotch Block, ON
www.creditdotpinball.com
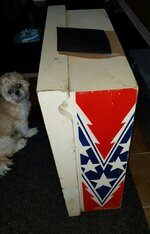
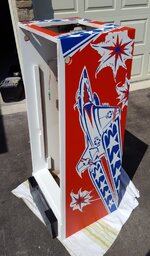
With the up and down weather, I've finally be able to squeeze in stenciling the head. I would normally spray the entire cab in one shot, but I'm experimenting with some new equipment, and I've never used a vinyl stencil kit before...so baby steps to be safe. I bought a twenty gallon compressor with a 3HP motor to run a LVLP spray gun. I'm using water-borne enamels, as they will provide a durable finish with easy cleanup. After sampling quite a few brands of paint and finishes, I found a Dulux enamel in a melamine finish to my liking. Its the stuff contractors use on cabinetry, and fully tintable to the entire range of colours available in quarts and gallons. And the price was nice, too. Jeff from Pinball Pimp swears by Rustoleum in a rattle can, but the colours and finish are so limited in the rattle can line, I just couldn't bring myself to do it (the high gloss finish of the rattle paints wasn't something I could compromise on). I found I didn't have to thin my paint of choice too much to get it to lay down properly using a 2.0mm tip. I added a dash of Floetrol to make the paint sit down nicer when thrown from the gun, and thinned with a miniscule amount of water to arrive at the desired consistency for the paint. "Dash" and "miniscule", pretty technical measures, right? The LVLP gun worked well for me: the paint came out slowly and at a controlled rate. LVLP guns work a lot slower than their HVLP big brothers, which is just fine by me...I'll take a controlled, even finish over speed any day. I put down one coat of white on top of my cream primer, and that was enough. Immediately after completing my first stencil layer (red), I wasn't too keen on the stencil results, but after a few touch-ups with a brush and adjusting my technique for the second blue layer, I can safely say I'm happy with the results. For the main cabinet, at the suggestion of Drano, I'll use a hair dryer to gently persuade the stencil to adhere a little better. Simply burnishing the edges with the provided still led to some instances of bleeding.

000-pins.jpg 000-pins2.jpg

I've now started reassembling the head. I installed a new power supply board, as the one it came with was hacked up pretty bad (a $70CDN investment worth while, I think). It was a pain in the ass to install...as anyone familiar with Bally games of this era will know: the wires from the transformer are soldered directly to the rear of the board. I have the hinged display panel removed to give it a fresh coat of paint and to scrape the crud off of the displays, which look like they've been in a Three Stooges-esque food fight. Also, toying with the idea of trying out Wolffpac 6-Digit replacement displays, an affordable alternative to other replacement displays, but having seven sets of numbers to replace (6 players + 1 credit/ball count) makes it a hard pill to swallow.

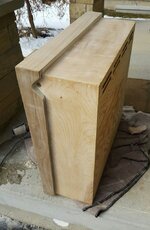
I have the main cabinet completely stripped down to the wood with filler applied--I'm just waiting for an opportune moment to get it sanded smooth and apply the primer. Then the painting "fun" begins all over again...
 

DRANO

Super Member
Nov 15, 2012
2,827
519
113
Mississauga
Nice tips Rob!
Can you post any details on the LVLP gun?
That and the waterborne paints sound like a great option for home use. I'm assuming there isn't a lot of over spray and "bounce" with a low pressure setup? Was it clean enough to do in the garage or is this still an outdoors endeavor?

Thanks!
Adriano
 

spiroagnew

Well-Known Member
Staff member
Dec 1, 2012
1,334
311
83
Scotch Block, ON
www.creditdotpinball.com
Can you post any details on the LVLP gun?

The LVLP gun I got is a SprayIt SP-33000, available from Home Depot or Amazon here in Canada. Made by California Air Tools. Good quality for the money. Bought it in a kit that came with 1.5mm, 1.7mm and 2.0mm needles/tips.

I'm assuming there isn't a lot of over spray and "bounce" with a low pressure setup? Was it clean enough to do in the garage or is this still an outdoors endeavor?

From what I've read, 80-90% of the paint you put in the LVLP reservoir cup ends up on what you point it at, as opposed to the HVLP, which has great coverage, but shoots paint all over the bloody place. I was shooting at about 35-40PSI. You still need a powerful/large tank compressor to keep up, even though the pressure used is fairly low. For a hobbyist that doesn't have a dedicated painting space, LVLP is a good option. I'm wondering if I'll be able to use the LVLP gun with the stencils I cut for Gottlieb cabs though. Those are weighted down with nuts, bolts and other assorted scrap, not stuck with adhesive, and even with its low pressure, it may blow the weights and stencil right off the cab seeing as you have to be fairly close to what you are painting to get good coverage. Good thing I've got a few games of my own lined up to test out...

The waterborne paints sound like a great option for home use.

I liked the mid-gloss finish on this paint a tad more more than that of the Molotow paints I was using on the Gottlieb cabs last summer. Soap and water cleanup is a bonus. I had to scrub some of the white frame of the head with soap and water to remove some newspaper ink, and the finish stood up great. My gameroom sees a lot of grubby hands, my kids and my own, so having a durable finish is a double extra bonus.
 

Menace

Well-Known Member
Staff member
Nov 14, 2012
2,440
255
83
Santiago de Aurora
This is excellent info for anyone looking to do some of their own cab projcets. (like myself) Thanks for posting!

D
 
Last edited:

DRANO

Super Member
Nov 15, 2012
2,827
519
113
Mississauga
Thanks Rob.
Looks like a good value and verstile gun for sure. Might have to get one to play around with at home. I already have the compressor setup so the hard part is done. Love the multiple nozzles too.
Until now I've only been using HVLP (at work) for clearcoat... which is fine because you want to lay down a lot of material in as short a time as possible... but this is a great option to rattle cans for the colour work. I do love the high quality and rich pigment of the Molotow and other artists spray paints but they are fairly toxic and messy. Being able to custom mix colours and still have a quality finish that isn't "house paint" is fantastic!

great post!
 

spiroagnew

Well-Known Member
Staff member
Dec 1, 2012
1,334
311
83
Scotch Block, ON
www.creditdotpinball.com
So much for painting the body this weekend! That April Ontario snowfall will get you every time!

I managed to get a final coat of primer on the 6MDM cab Saturday morning before the flurries flew, so at least I didn't get cut off in the middle of a process. I was forced indoors to clean up and polish the coin door, and start cutting stencils for a few upcoming Gottlieb EM cab repaints in the spring. I think I only have to polish up the siderails of the cabinet, and then I'll be done everything I can, the cabinet paint will be the final piece of the puzzle. If there is some good news for the project, its that the entire 6MDM cabinet went with white base only, no spatter or webbing, so after the white basecoat is applied and set, I can go straight to town with the stencils.
 

spiroagnew

Well-Known Member
Staff member
Dec 1, 2012
1,334
311
83
Scotch Block, ON
www.creditdotpinball.com
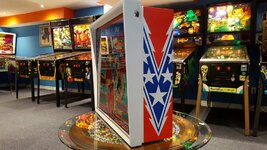
Time to bump this thread. Stenciling is now complete. I had a couple of setbacks: first, I was preoccupied with other cabinet painting projects, and second, the paint I first chose to use gave a less than desirable result. I picked a waterborne alkyd by Dulux sprayed from an LVLP sprayer powered by a compressor. The finish it gave was spot on, but there was a problem: the alkyd is a high-quality kitchen cabinet paint, and is manufactured to withstand high traffic and be easily cleaned. Whatever they add to the paint to make the finish stain resistant, Teflon or some other sort of space age material, also made the Pinball Pimp stencils not stick to it fully! So the red and blue stenciled colours bled like a mother*cker at nearly every edge. The sticker stencil just wouldn't stick to the finish of the white base paint. I thought I could just touch it up like I did the head, but the bleed was so bad, I had no choice but to sand out the mess I had and try again. Luckily, Jeff from Pinball Pimp is an extremely nice guy and re-cut a few of the extra stencil layers that I had already used in the bleeding effort to complete the set for another attempt.

I sanded down the finish of the Dulux alkyd with 200 grit, and went with what I knew: Molotow and Montana artist spray paint. And I couldn't be happier with the results. I may be blinded by the success of the project, but I think this cab stencil is one of Bally's most beautiful. Time to put the cabinet back together and drop the playfield in.

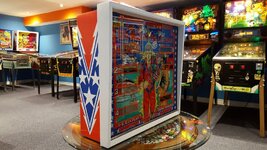
The final product before hardware:
000-pins.jpg
 
Last edited: