• We have upgaded to the latest version of XenForum and the process finished without any errors!!!! Enjoy the new forum!

Painting my Centigrade 37 cabinet

DRANO

Super Member
Nov 15, 2012
2,821
517
113
Mississauga
Oh, poor EM section... time for some more love :D

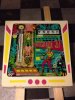
I bought my first EM almost a year to the day last October. A Centigrade 37 no less!
My love affair with these classic Gottlieb wedgeheads has been strong ever since and I have 6 of them to date. I find I sometimes play them more than my modern pins.

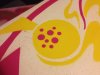
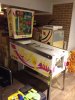
This C37 was in fantastic shape and I was determined to make it a showpiece of my collection. It arrived with just over 60,000 plays (most games of this era are well past 100,000). The playfield was super clean and I have since touched it up, filled in cupped inserts and clearcoated it.
Mechanically it was pretty solid. Just needed a couple of little tweaks.
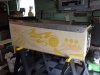
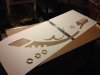
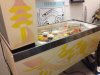
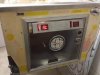
The only real flaw on the game was a very badly faded left and front side. The pink was almost completely washed out.

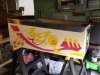
Now that I have the playfield done and ready to re-assemble, I started upon the task of re-painting the pink. I decided to only do the one colour because the rest of the cabinet was in really nice shape.

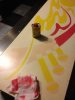
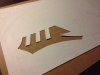
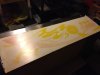
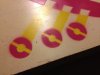
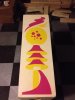
I spent a lot of time reading Clay's guides and despite his advice, I figured I would try using the same frisket masking film that I use for airbrushing playfields... well, this was a mistake.

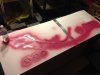
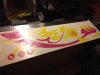
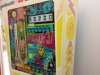
The photos below look okay, but let me say that the paint got everywhere. I had to stick the film to the cabinet, cut the film (thereby cutting the cabinet) and then spray. The paint bled underneath and I had to spend a lot of time with some mineral spirits and Q-tips just to get it looking okay.
I was also not crazy about the glossy appearance of the Krylon paint I used when compared to the rest of the cabinet.
 

Attachments

  • IMG_4848.JPG
    IMG_4848.JPG
    1.5 MB · Views: 1,203
  • IMG_4849.JPG
    IMG_4849.JPG
    1.9 MB · Views: 1,202

DRANO

Super Member
Nov 15, 2012
2,821
517
113
Mississauga
My next step was to start over.
I went back to Clay's guide again and noticed that he also had tried Frisket and really disliked it for this application. Hmmm, wish I had seen that before :(

He also indicated that Goof Off was pretty good at removing bad paint jobs done over the original art.
So, at the cost of a few brain cells, I was successful in removing most of my botched 1st attempt.

The paint tended to stick into the cut-lines made by my scalpel, but othwerwsie it came off really well.
 

Attachments

  • IMG_4870.JPG
    IMG_4870.JPG
    2 MB · Views: 1,200

DRANO

Super Member
Nov 15, 2012
2,821
517
113
Mississauga
PhilGreg said:
Doesn't look too bad to me, what did you not like about the job?

Well, up close it did not look authentic. The edges had to be cleaned up just to get it looking okay and the paint finish itself was terrible. Pics hide a lot.
 

DRANO

Super Member
Nov 15, 2012
2,821
517
113
Mississauga
Okay, back to the rest of the story...

My next step was to do this the right way... make a stencil.

I went to Curry's and grabbed a roll of tracing paper and tried to locate a suitable board for the stencil. I wanted it thick enough to avoid curling after one use (I have to do both sides to get the colours to match) but I also wanted it thin enough to cut easily.

I ended up with a suitable board that was about 40" square.I cut it in half, taped the ends together and it was a perfect size.

I traced the cabinet, made it slightly oversized to make sure I covered the botched job and the original colour on the good side.
I used some low-tack spray adhesive (also from Curry's) and applied the tracing paper to the board and began to cut with a new sharp scalpel.
 

Attachments

  • IMG_4871.JPG
    IMG_4871.JPG
    2.5 MB · Views: 1,191
  • IMG_4872.JPG
    IMG_4872.JPG
    2.2 MB · Views: 1,191

DRANO

Super Member
Nov 15, 2012
2,821
517
113
Mississauga
While I was at Curry's I was lucky enough to find that they had a wall of "artists" spray paint with a ton more colour selection than Canadian Tire ;)

I can't recall the brand name, but I found a very close match to the pink and it even had a more flat finish vs. the semi-gloss of the krylon, and it ended up applying and drying much more evenly.

Clay suggests applying some low-tack spray adhesive to the back of the stencil before laying it down.. which I did. In some places the stencil was still lifting. A little is okay since you'll get that classic overspray look, but too much is not desireable. I used a few random items to help keep a few edges down and then sprayed.
The Stencil is quickly removed to avoid any sticking.

Here are some process pics:
 

Attachments

  • IMG_4873.JPG
    IMG_4873.JPG
    1.9 MB · Views: 1,189
  • IMG_4874.JPG
    IMG_4874.JPG
    2.2 MB · Views: 1,189
  • IMG_4875.JPG
    IMG_4875.JPG
    2.1 MB · Views: 1,190

DRANO

Super Member
Nov 15, 2012
2,821
517
113
Mississauga
And a few detail shots to show a little oversray and the soft edge that you sometimes see on these cabinets.
This is normal and, in fact, probably desirable.

My stencil is maybe 1/16" oversized in some areas and this really helped hide the cuts made during my Frisket attempt.

Today I will do the other side and then repeat the stencil process for the backbox sides and front... as well as the front of the main cabinet.


One of the things I forgot to mention was the prep.
Clay recommends cleaning these cabinet with Mean Green. It supposedly really removes the sludge and yellowed layer off these games.
I could not locate my bottle of Mean Green so I tried a magic eraser and some alcohol. It worked great! The cabinet came super white and the eraser was covered in sludge. It also left a white residue everywhere so I used some general household cleaner and paper towels to finish the job. The results were surprising.

I'll post pics of the finished cab in the next few days.
 

Attachments

  • IMG_4876.JPG
    IMG_4876.JPG
    2.3 MB · Views: 1,189
  • IMG_4877.JPG
    IMG_4877.JPG
    2.6 MB · Views: 1,189
  • IMG_4878.JPG
    IMG_4878.JPG
    2.7 MB · Views: 1,189

PhilGreg

Member
Nov 28, 2012
67
3
8
Yep,
better with the overspray and soft edge IMO.

Looks like a hard stencil is the only way to go.
 

mwong168

Administrator
Staff member
Nov 14, 2012
6,662
1,420
113
45
Toronto
Awesome work as usual and keep that stencil handy in case I ever decide to bring in a C37 in the near future. I can't wait to play it once you have the new clear coated playfield populated and back in your game.
 

DRANO

Super Member
Nov 15, 2012
2,821
517
113
Mississauga
Figured I would circle back and show the rest of the cabinet.
I finished up the front stencil and did the backbox too.

Here are some pictures showing the original state of both parts and a whole shot of the very faded left side.
 

Attachments

  • IMG_1182.jpg
    IMG_1182.jpg
    212.3 KB · Views: 1,129
  • IMG_1184.jpg
    IMG_1184.jpg
    251.3 KB · Views: 1,129
  • IMG_1191.jpg
    IMG_1191.jpg
    194 KB · Views: 1,130

DRANO

Super Member
Nov 15, 2012
2,821
517
113
Mississauga
And a few "after" pics of the finished paint job ready for metal cleanup and re-assembly.
 

Attachments

  • IMG_4902.JPG
    IMG_4902.JPG
    2.3 MB · Views: 1,129
  • IMG_4903.JPG
    IMG_4903.JPG
    2.8 MB · Views: 1,129
  • IMG_4907.JPG
    IMG_4907.JPG
    2.6 MB · Views: 1,129

tkaye

Active Member
Mar 17, 2013
597
59
28
54
Ancaster, On
Unbelievable work Drano!
I have to say you seem tireless in your efforts and your collection shows it!
Thanks for sharing
 

mwong168

Administrator
Staff member
Nov 14, 2012
6,662
1,420
113
45
Toronto
You cabinet looks amazing and can't wait till you get your beautiful playfield back in and see how fast it will play!
 

Luckydogg420

Member
May 12, 2013
825
24
18
Kitchener
Looks great. Much nicer then the faded pink.

I'd be interested in seeing your process for cleaning up the coin door. I'm useing the same one in my virtual cab build
 

manitouguy

New Member
Jul 21, 2013
26
0
1
vancouver bc
wow, great post and great looking machine! thanks for sharing!

I just picked up a home use only strange world with very little cabinet fade ... and was comparing the pinks to my c37 (which like most is quite faded) - I think it is the same color on both machines and yes, looks much nicer in its 'fresh state'!

thanks for the tip on the magic eraser and rubbing alc too - I thought my c37 and other cabs were not all that yellowed until I put the strange world beside them

I will have to post my 'blunder' thread on how I nearly destroyed my c37 playfield too!!

cheers, and again beautiful work!

Ron