• We have upgaded to the latest version of XenForum and the process finished without any errors!!!! Enjoy the new forum!

Dr@No's fun filled (and often long-winded) restorations

DRANO

Super Member
Nov 15, 2012
2,827
519
113
Mississauga
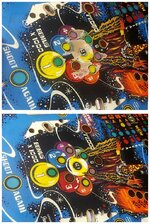
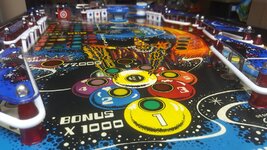
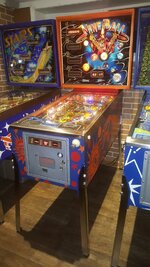
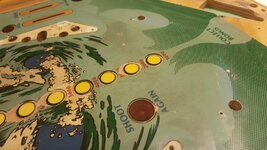
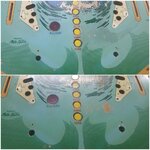
Just a quick update showing the final product on this Nine Ball touch-up.
I sealed my repairs with some spray can clear in this case and then blended the finish across the entire playfield with a series of wet-sanding/polishing to match it all up. The goal was to make it look like a minty original, not a brand new work of art. I think it was successful and the game now looks and plays great without the trouble and expense of a massive overhaul.

Before_After_.jpg


20170818_014707.jpg


20170827_203346.jpg
 

DRANO

Super Member
Nov 15, 2012
2,827
519
113
Mississauga
Wow, nice. Which clear, 2X?

Dude, I don't even know :D
I'm ashamed to admit it was some old can of rattle-can "auto" clear that I had bought at Canadian Tire.

I'd used it before for spot clearcoating where I mask off an area of the playfield and then blast a shot or two of this stuff. The goal is not to get an even glossy clearcoat, but rather just to seal and level the repair area. Then I actually sand it smooth and try to blend it into the rest of the playfield for more of a polished semi-gloss/satin look.

As I got comfortable with this technique, I started to apply it to larger and larger repairs on games where I did not want (or feel it necessary) to do a full blown strip-down and clearcoat or full restoration. On recent projects like my Frontier and this Nine Ball I didn't even bother with the cut masking, I just covered up the surrounding areas of the playfield and shot the stuff freehand. You get pretty good control with a can and then I was able to feather it all in. I did all of the insert outlines and other little touch-ups as well.

It's not a method I would recommend for every application, but it worked well here and I've had a bit of practice with it now.
 

DRANO

Super Member
Nov 15, 2012
2,827
519
113
Mississauga
It's good to know you can get such amazing results without going full tilt on a resto! Thanks.

Yes, I jokingly refer to these projects as my "good'nuff" series :)

Also, because I'm only using the clear to seal the art and not to lay down a thick layer, these games are playable within days of the final finish.
 

DRANO

Super Member
Nov 15, 2012
2,827
519
113
Mississauga
I'm picking up on an ongoing project that I had put away for most of the Summer.
In keeping with my recent run of classic 'sturd' projects, my Stern SeaWitch has been disassembled for some time.
The cabinet was really rough and the playfield also needed a lot of love. Despite all that, the game played really well and the plastics and backglass were excellent.
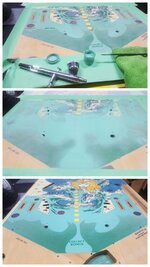
I stopped working on the playfield in the Spring, hoping to get a few other playfields together to shoot at the same time... but this one required a little more love than most. The big field of blue on the lower half just had a ton of ground in dirt. Magic eraser did a fair job of cleaning it up, but the colours were just so worn and uneven that I had to give it a light coat of fresh colour to level it out.
The amount of complicated cuts needed to mask this area off probably factored into my procrastination.

In any case, I figured I should get this one further down the line since I'm doing a few other playfields at the moment and also some cabinet stencilling (which I'll cover in another post).

Here are some shots of the original condition after basic cleaning, some damage caused to the soft/worn paint by the magic eraser and then the stages of the masking and airbrushing.
My end goal will be to make custom transfer decals for the text that had to be painted over. If anyone saw my Quicksilver playfield, you'll know what I mean.

Enjoy!

20161124_234908.jpg


20161216_230853.jpg


20170830_004851.jpg
 
  • Like
Reactions: WARLOCK

superjackpot

Active Member
Nov 19, 2012
342
45
28
Mississauga, ON
Looks fantastic. Hours of work just to get to the painting part which doesn't take nearly as long I'm sure.

Do you take steps when mixing/matching your paint to ensure the final colour — after clear coat is applied — doesn't change (become brighter/darker)? Is this even a consideration?
 

DRANO

Super Member
Nov 15, 2012
2,827
519
113
Mississauga
Looks fantastic. Hours of work just to get to the painting part which doesn't take nearly as long I'm sure.

Do you take steps when mixing/matching your paint to ensure the final colour — after clear coat is applied — doesn't change (become brighter/darker)? Is this even a consideration?


Yes, great question. There was some bare wood as you can see. I always like to seal that up by hand with a brush first and also I like to clearcoat and sand until the playfield is somewhat smooth before I airbrush.
Because of this I mix some colour and use it as a primer for those first bare wood touchups. Then I seal.
I was able to get a really close match if you look closely at the early repairs in the first few pics. I even got to see how it looked after a layer of clear.

Once I knew it was that close, I simply added some airbrush medium to the mixed paint in order to thin it... and applied the remainder via airbrush in this most recent step. It was a very thin layer just to balance out all the uneven colour. And yes, it was maybe 5 minutes of spraying after hours of trimming and prep :(
 

DRANO

Super Member
Nov 15, 2012
2,827
519
113
Mississauga
Thanks Tim.
My dream is to have Seawitch and Fathom fully restored and side by side.
Two awesome games from the same year and competing manufacturers; using near identical systems. Both machines with like themes, unique sounds and 3 flippers in near identical configurations. Both with heavy use of drop targets and spinner as well. I think it would be a great pairing and comparison to say the least.
My gut tells me Seawitch still comes out slightly ahead, but it'll be close ;)
 

Aunt Agnes

Member
Nov 5, 2015
80
22
8
45
Kitchener, Ontario
Thanks Tim.
My dream is to have Seawitch and Fathom fully restored and side by side.
Two awesome games from the same year and competing manufacturers; using near identical systems. Both machines with like themes, unique sounds and 3 flippers in near identical configurations. Both with heavy use of drop targets and spinner as well. I think it would be a great pairing and comparison to say the least.
My gut tells me Seawitch still comes out slightly ahead, but it'll be close ;)

That's a real tough problem to have

Great work you've done so far. Can't wait to see it finished.

How's the Future Spa project coming along?
 

Dr.Dude

New Member
May 26, 2017
13
9
3
63
Manotick, Ontario
Thanks Tim.
My dream is to have Seawitch and Fathom fully restored and side by side.
Two awesome games from the same year and competing manufacturers; using near identical systems. Both machines with like themes, unique sounds and 3 flippers in near identical configurations. Both with heavy use of drop targets and spinner as well. I think it would be a great pairing and comparison to say the least.
My gut tells me Seawitch still comes out slightly ahead, but it'll be close ;)
As a member of the side-by-side Seawitch/Fathom club, I couldn't agree more! Seawitch probably has the edge in terms of playability, but Fathom is a better sound/lights package, and multiball as well. Tough choice, and great problem (choosing between the two) to have!
 

DRANO

Super Member
Nov 15, 2012
2,827
519
113
Mississauga
Thought I'd post an update and a nice little tip for polishing chrome.

I've been working hard to declutter the game room and garage/workshop for some time now. I recently sold my Shadow and Stern Ali to gain space, moved some larger parts/items into storage and just did some overdue spring cleaning.

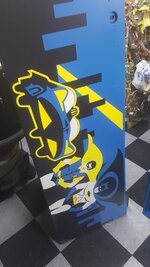
With the extra space I've resumed work on my custom Batman cabinet and repainting my Seawitch. Here's a shot of the custom stencil work on 'Holy Pinball Batman'

20170923_125209.jpg


At the same time, I've been receiving some refreshed cabinets from Spiroagnew for my Williams Heat Wave and GTB Sweet Hearts. Now that they were both back I decided to start repopulating the cabinets and then getting to work on the playfields.

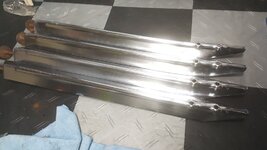
One issue was the legs. They were looking pretty tired and tarnished. While I usually keep some standard sized repro legs lying around, these were not standard so I wanted to clean them up as well as possible.

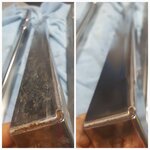
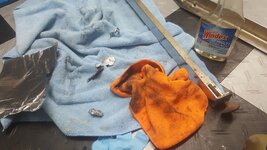
I'd heard in some car/motorcycle forums that rubbing tin-foil on chrome with coke would remove any pitting and tarnish without scratching like steel wool. I've also read that coke wasn't necessary and one could use water. I had some vinegar Windex so used that. The process creates a grey sludge in the surface which is full of aluminum oxide and somehow this does the trick. Here are a few photos. Oh yeah (wear gloves).

20170926_223925.jpg


20170926_225739.jpg


20170930_143753.jpg


The effects were amazing on any chromed surface. However, not so great on the back where there was little to no chrome plating.

Unfortunately, the leg levelers were rusted and seized so I ended up having to dip them into a rust bath overnight. That got things loose enough to pry them off.

Anyway, an easy and inexpensive way to bring new life to your chrome parts if they aren't too far gone.

Enjoy!
 

DRANO

Super Member
Nov 15, 2012
2,827
519
113
Mississauga
FIREPOWER - Prototype Drop Target Mod

This thread has been dormant for almost a year
Maybe it's time to add a little content. Hopefully some of you Firepower fans out there will find this useful.

I picked up a decent players FP in a 3-game lot from PBREV member Completist earlier this year.
I've always kinda liked the game, but having it at home really cemented that feeling. It's just simple, pure fun 80's pinball at it's finest.
I was also always intrigued by the idea of converting one of these to use drop targets in place of the 1-6 stand-up targets in the middle of the playfield. Apparently, the sample games (inclding the one in the flyer) had drop targets and the existing code still supports them. All it needs is a little mechanical work to swap the target banks and some wiring.

By now, this transition has already been well documented by none other than Ted Estes, but I've been following the guide posted here:
http://pinball.flippers.info/firepowerdroptargets/

I've noticed the guide isn't perfect and there are a few mistakes to watch out for, but it's been good so far.

I'll try and cover my progress.
Firstly, the game I got wasn't all that bad but I've been itching to try one of those new Hardtop playfield overlays from Outside Edge and I managed to get one of the first Firepower test prints at the Allentown show earlier this year.
http://www.pinballgifts.com/hardtop.html

Around the same time, I located two sets of williams 3-target banks. It has to be the ones with the horseshoe contacts.
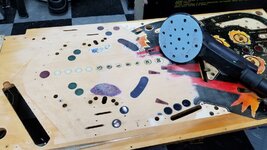
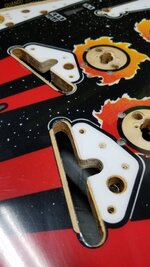
I spent the first little while refurbishing these and, more recently, I've pulled te playfield, sanded the old art off, and have since stuck down the hardtop.

Part of this process involves routing out 2 slots for new 10pt switches that have to go behind the target banks. I did this with a combination of drill and Dremel router. The same edits had to be made to the hardtop as well.

This is about where I'm at at the moment. I'll be installing the target banks, switches and running the new wiring next. Stay tuned.

IMG_20180506_153629_609.jpg


20180817_184602.jpg


20180819_213803.jpg


IMG_20180506_153629_605.jpg
 
  • Like
Reactions: dnaman

DRANO

Super Member
Nov 15, 2012
2,827
519
113
Mississauga
FIREPOWER - Prototype Drop Target Mod

I installed the drop target mechs and switches last night and began running some of the new wiring. The fit looks great so far.

IMG_20180823_101441_632.jpg
 

DRANO

Super Member
Nov 15, 2012
2,827
519
113
Mississauga
FIREPOWER - Prototype Drop Target Mod

Last night I started soldering the wires over to the new parts.
The drop target bank is pretty easy and it's just a matter of moving the common wire from the stand-up targets to a single point on the back of the DT bank. My drop target bank already had the original daisy-chained connections in place between all 3 targets, so I didn't have to do any of that. Then, each of the white/colour banded wires from the original targets just got moved over to the corresponding lug on the back of each drop target contact.

One thing that confused me however was the wiring for the continuous switch contact and also the new 10pt swicthes I added.

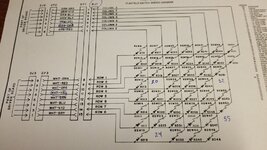
The guides that I referenced do a good job of telling you what colour wire goes to each, but they forget to spell out that these switches need to be wired into the matrix and where those connections should be made on the playfield. I guess they assume that most people are smart enough to figure it out on their own
icon_e_smile.gif


Well, I guess I'm not so smart, so I spent a lot of time this morning looking at the schematic and I think I have it all figured out.

SCHEM.jpg

You can see in the schematic of the switch Matrix where I've written the numbers 20, 24 & 52, 55

20 & 24 are the unused swwitches which will now be located on the end of the two drop target banks for the continuous contact
52 & 54 represent the new 10pt stand-up switches added that will sitt behind the rubber ring behind each drop target bank.

I will need to make sure that I connect them into the corresponding columns and rows by physically finding the neighouring switches already on the playfield and joining them to those.
I'm going to run the new wiring tonight and will take some photos. Maybe that will help anyone else that (like me) gets stuck on step #10
 

DRANO

Super Member
Nov 15, 2012
2,827
519
113
Mississauga
Yup. Less than half the cost of a repro from CPR and no need to depopulate the underside. But, they have their drawbacks too.

For games that aren't grails or where no other option exists, I think it's great.
I also picked one up for Taxi to do later