You are using an out of date browser. It may not display this or other websites correctly.
You should upgrade or use an alternative browser.
You should upgrade or use an alternative browser.
Dr@No's fun filled (and often long-winded) restorations
- Thread starter DRANO
- Start date
Fifty
Active Member
Drano this looks simply incredible! So much better than stock! Beautiful add-on!
https://flic.kr/p/uFGyWq
https://flic.kr/p/tKipSp

Needless to say, I was very happy with the results.
Once I mount this to the backboard of the game, the arms should give the appearance that it is mounted to the side of the cabinet.
That's all for now.
Hopefully this sucker will be sitting in the cabinet next time I update!
Dr.@NO
Hey Drano, what is your estimated cost for producing this? Minus the 3D printer. I love the idea of getting a 3D printer, there are a lot of things I would like to try making, and theres tons of neat stuff on thingverse to be made. Just trying to get an idea of costs of material.
Hey Drano, what is your estimated cost for producing this? Minus the 3D printer. I love the idea of getting a 3D printer, there are a lot of things I would like to try making, and theres tons of neat stuff on thingverse to be made. Just trying to get an idea of costs of material.
The cost is negligible once you have the printer and spools of plastic. An entire spool cost me about $15 and I could probably print 100 of these
If I was making these to sell the only thing I'd have to factor into the price was my time, a little bit of paint and that's about it.
Bro, great work as usual. Thanks for the updates.
If I wanted a TOTAN, I would pick this one and load it up quickly.
(Before Drano comes to his senses and keeps it that is.) JPOP - DS! (Disappointment Syndrome)
I picked this pin up for Drano and she is as a magnificent as an original specimen that I have seen, except Menace's...
The only reason that she isn't in my basement is; (I had 2 TOTAN'S) 1 gone now and I have kept the Chad Keller restore example.
(So by the "$10k by Xmas rule", someone could have the Keller from me + I would take Drano's original all day long.) Or go buy Dr@no's.
Oh, colour DMD included in the Chad Keller TOTAN as well.
(Yes, Drano and I do discuss this while I post it. That's it.)
Last edited:
The cost is negligible once you have the printer and spools of plastic. An entire spool cost me about $15 and I could probably print 100 of these
If I was making these to sell the only thing I'd have to factor into the price was my time, a little bit of paint and that's about it.
I believe you have the M3D printer? How are you liking it? Would you recommend it?
Yes. It's the Micro from M3D.
Its on the smaller side but I've been very pleased with it so far.
I've been having challenges printing in ABS, but there are a few tricks to prep the printer for this plastic that I haven't tried yet. I'll only need it if I ever plan to make a repro of a broken pinball part that requires the additional strength.
Otherwise the PLA has been working great!
HIGH SPEED STIFF
Part 6
I can't express how busy I've been these last few weeks. This is the first week I've even been on the site for more than a few seconds. Work has just been insane and summer, well, is summer... always lots to do.
Nonetheless, the show must go on and I have needed my pinball 'therapy' now more than ever.
High Speed has been progressing along nicely and, with the help of another PBrev member, I was able to get sme sweet reverse decals made up for the clear ramp and push the project almost to completion.
Here are some pics!
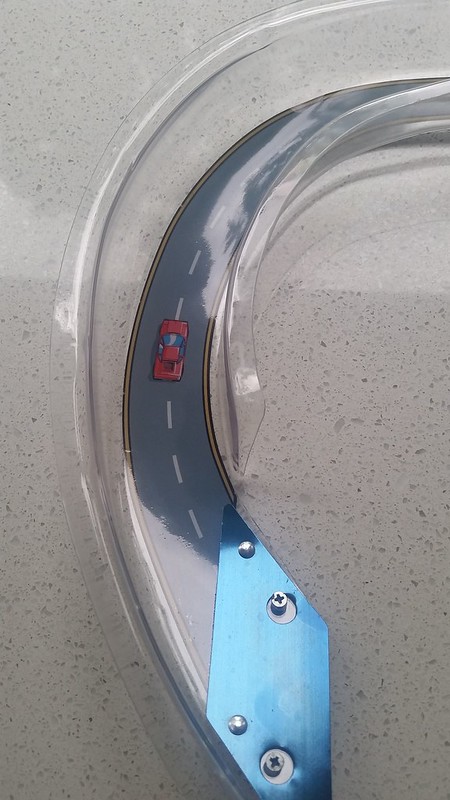
https://flic.kr/p/vdstH7
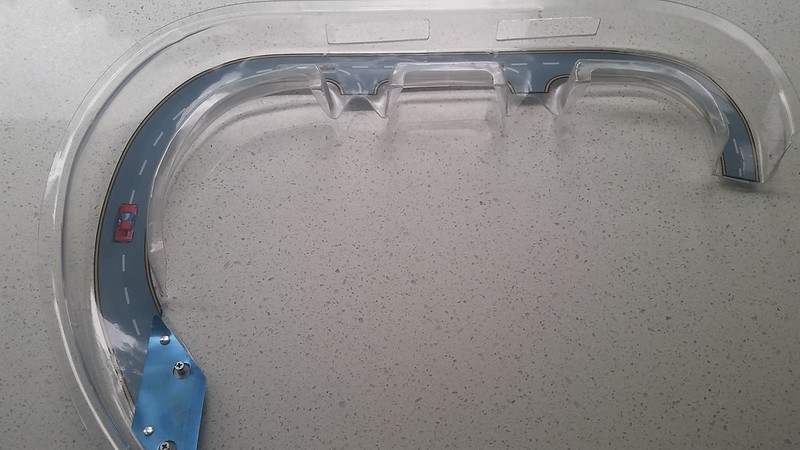
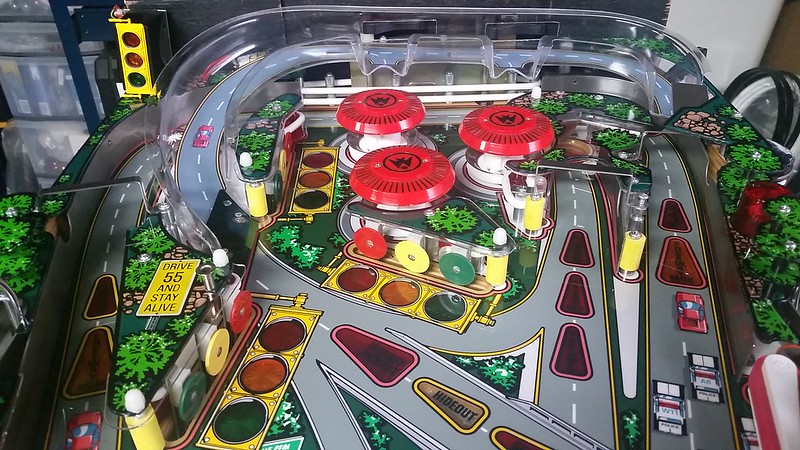
Aside from the slight colour variation to the playfield (which probably won't be noticeable in my gameroom) this turned out better than I could have hoped.
The rest of the assembly went very quickly and I refreshed the spinner targets and then proceeded to get the inside of the cabinet repopulated as well. Much cleaner now!
I also placed a new set of siderails. It should look really sharp once I regrain the old lockdown bar.
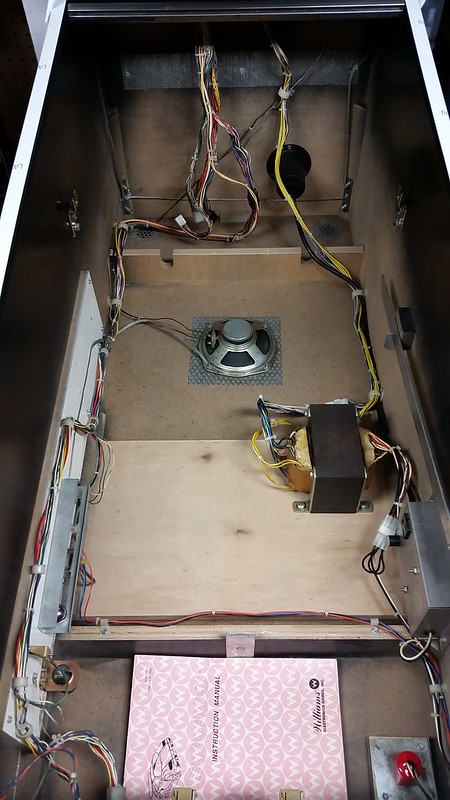
The final step is to put on the playfield hangers, apron and solder all the main solenoids wires back in.
This should've been done over a week ago but, as I said early, it's been super busy
Hopefully I'll be able to post a finished shot of the game soon.
Dr.@NO
Part 6
I can't express how busy I've been these last few weeks. This is the first week I've even been on the site for more than a few seconds. Work has just been insane and summer, well, is summer... always lots to do.
Nonetheless, the show must go on and I have needed my pinball 'therapy' now more than ever.
High Speed has been progressing along nicely and, with the help of another PBrev member, I was able to get sme sweet reverse decals made up for the clear ramp and push the project almost to completion.
Here are some pics!

https://flic.kr/p/vdstH7


Aside from the slight colour variation to the playfield (which probably won't be noticeable in my gameroom) this turned out better than I could have hoped.
The rest of the assembly went very quickly and I refreshed the spinner targets and then proceeded to get the inside of the cabinet repopulated as well. Much cleaner now!
I also placed a new set of siderails. It should look really sharp once I regrain the old lockdown bar.


The final step is to put on the playfield hangers, apron and solder all the main solenoids wires back in.
This should've been done over a week ago but, as I said early, it's been super busy
Hopefully I'll be able to post a finished shot of the game soon.
Dr.@NO
HIGH SPEED STIFF
Part 7
This post is only a couple of weeks late, but I did finally get HS downstairs.
First I brought the cab down and did a little shuffling. Farfalla got pulled from the SS/Alphanumeric section to make room for High Speed next to it's other sys11 brothers.
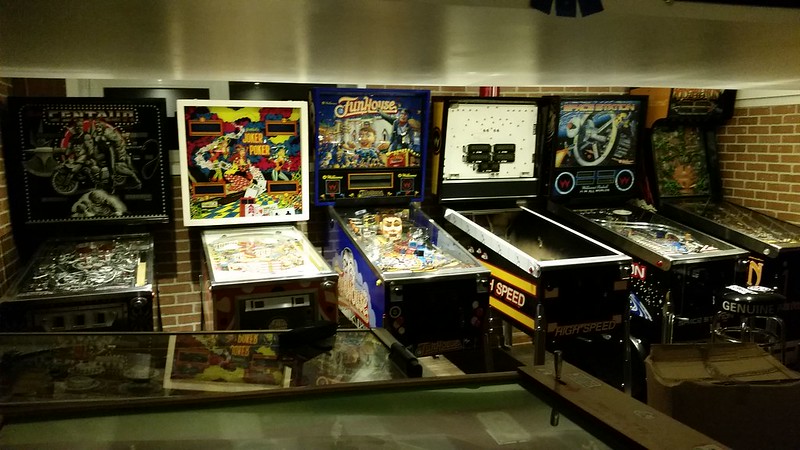
Then the playfield got dropped in. This was a relatively painless swap. Aside from a few switch adjustments, everything went pretty smoothly and the game was back up and running in a few minutes.
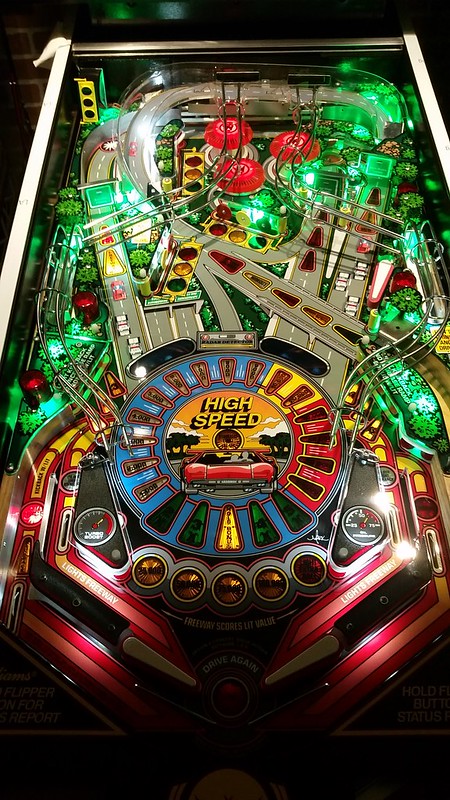
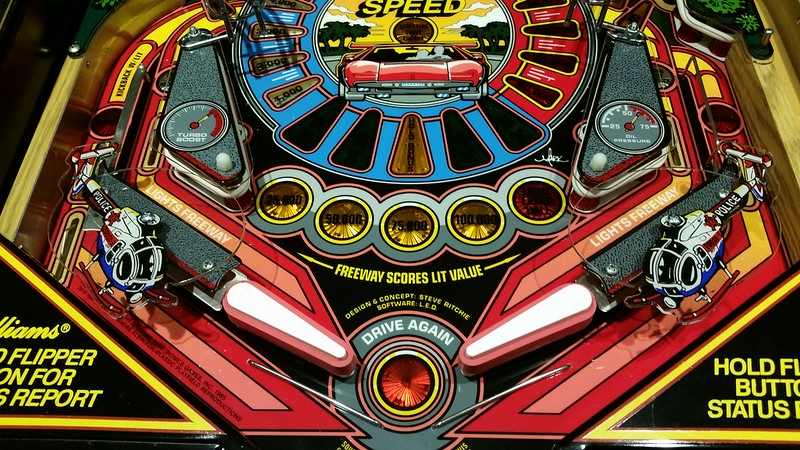
The finishing touches were added. Some custom free play cards and I also came up with a creative use for these helicopter plastics.
And finally some play-testing by the owner
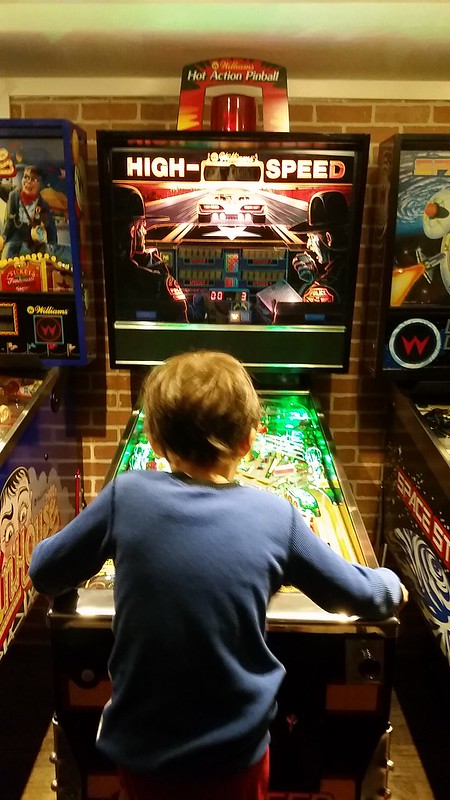
My son was thrilled to have HS back in the lineup (and so was I). I'm loving the clear ramp and the street-lamp mod. The CPR playfield is super fast and the new ramp with it's modified curve is much smoother than the stock black one ever was.
Back in the garage, Scared Stiff got moved to the end of the row as it will be the next one to get shopped and Strange Science finally arrived and got set up. I had some bugs to sort out with it but it's now playing pretty great!
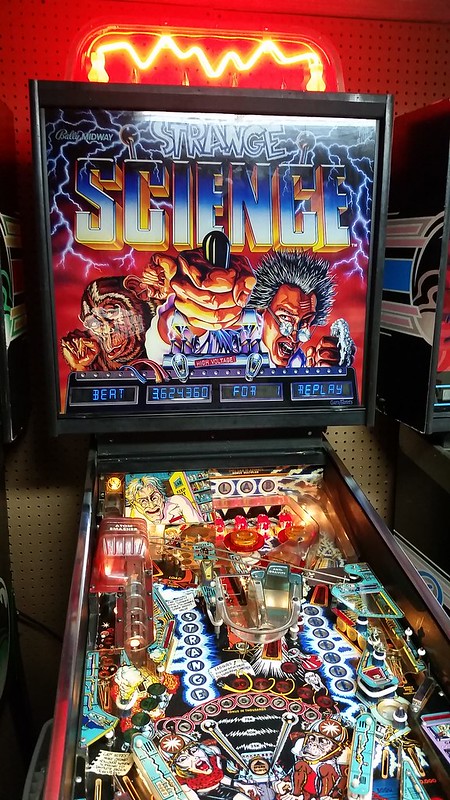
That's all for now.
Dr.@NO
Part 7
This post is only a couple of weeks late, but I did finally get HS downstairs.
First I brought the cab down and did a little shuffling. Farfalla got pulled from the SS/Alphanumeric section to make room for High Speed next to it's other sys11 brothers.

Then the playfield got dropped in. This was a relatively painless swap. Aside from a few switch adjustments, everything went pretty smoothly and the game was back up and running in a few minutes.

The finishing touches were added. Some custom free play cards and I also came up with a creative use for these helicopter plastics.

And finally some play-testing by the owner

My son was thrilled to have HS back in the lineup (and so was I). I'm loving the clear ramp and the street-lamp mod. The CPR playfield is super fast and the new ramp with it's modified curve is much smoother than the stock black one ever was.
Back in the garage, Scared Stiff got moved to the end of the row as it will be the next one to get shopped and Strange Science finally arrived and got set up. I had some bugs to sort out with it but it's now playing pretty great!

That's all for now.
Dr.@NO
Love the clear ramps over the black.
It has a slightly modified curve too. It feels great.
The re-design also eliminates the need for the clear plastic guard on top. Much cleaner!
I feel kinda bad that I haven't been updating this thread. This Summer was the worst on record for work (real work  )
)
I did have a lot of pinball action though. Scared Stiff has been put on hold for a little while but I have started to prepare for a large batch of playfields that need some touch-up and clearcoating.
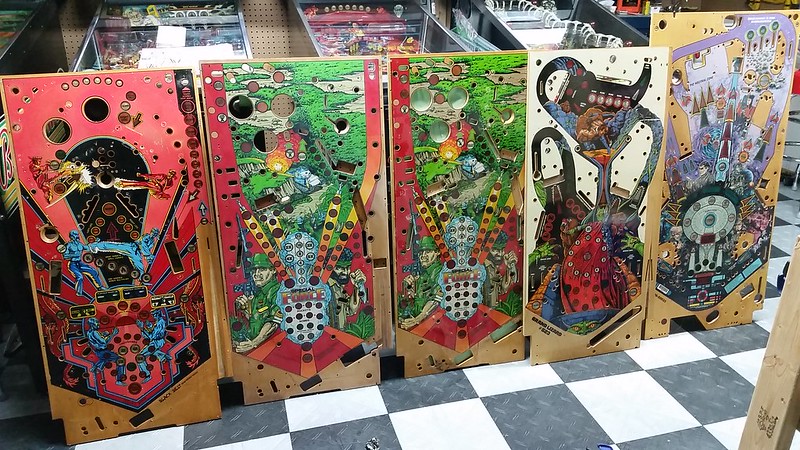
I have a few others that need work (CC, SS and Shadow) but I really didn't want to get into stripping those and have even more projects on the go. Note... CC did get brought home just lat week and will be next in queue. Most of these playfields pictured above require minimal work... except for STTNG.
This isn't one of my games. I took on this project for Menace (or rather one of his clients). I can't wait for payback when I drop off my beat to crap Cyclone for service
In any case, this playfield had been "restored" by someone but it was really a bit of a mess. Not only were some of the touch-ups horrendous, but the clear was de-laminating in some key areas. To make matters worse, this was all coated with Varathane instead of automotive clear.
I was only asked to sand it to remove the orange peel and cloudiness of the clearcoat and redo it. I offered no guarantees because mixing auto clear over top of Varathane isn't ideal and I would need to at least repair 3 arrow inserts that were too poor to leave alone.
I decided to pop out the inserts, sand them clean, re-insert and eventually apply new waterslide decals. I had to hand sand this first layer because I was really nervous about the quality of the existing finish. Here are some progress shots. I hope to get this done in the next couple of weeks and will post updates.
[url=https://flic.kr/p/zfrWrZ]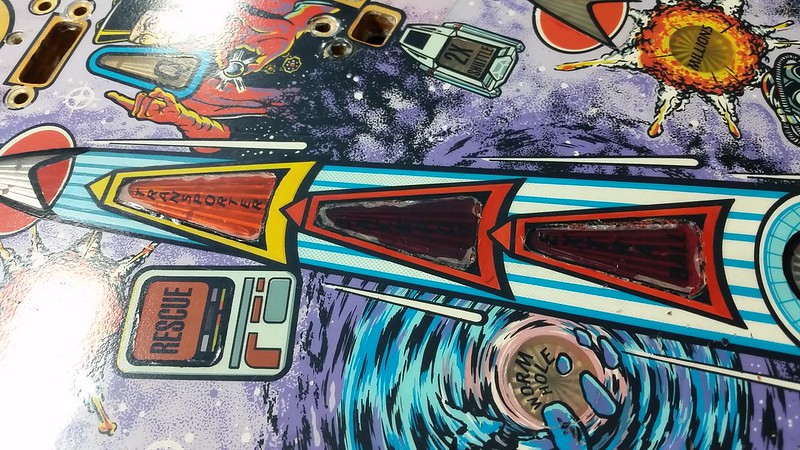
[url=https://flic.kr/p/zfrVG2]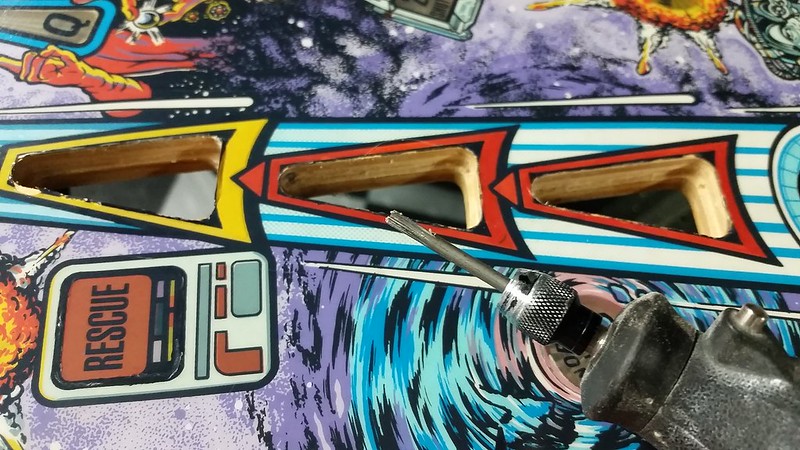
[url=https://flic.kr/p/zfrVQP]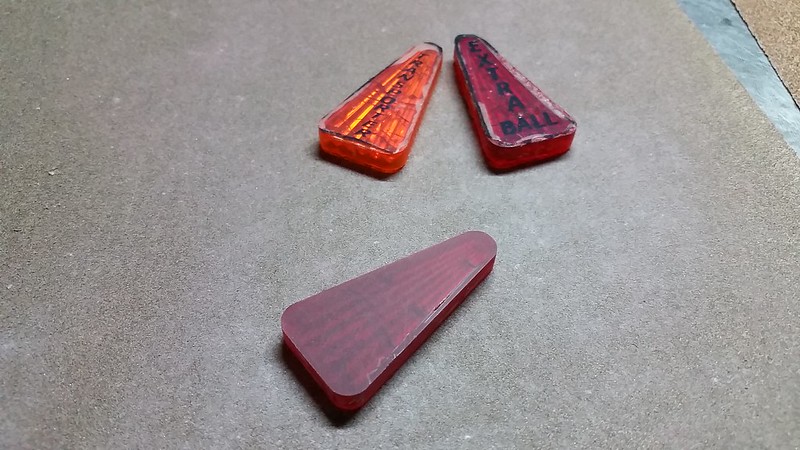
[url=https://flic.kr/p/yhztTw]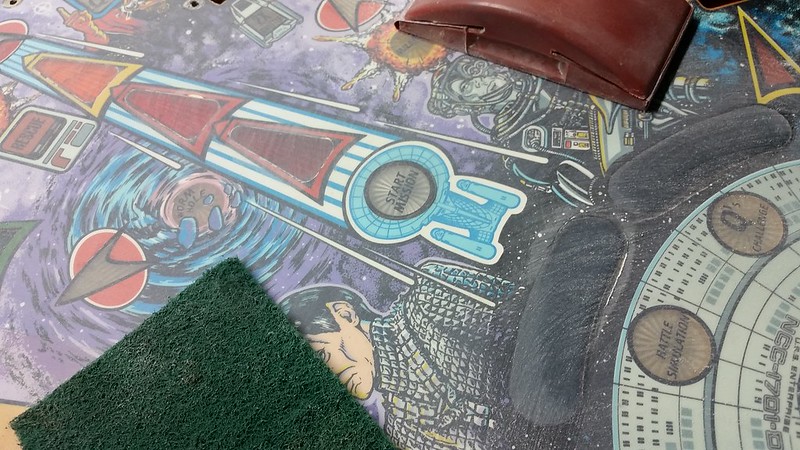
I also jumped on a few other small pinball related projects. Finally got my PINSANITY posters framed and hung. Of course I had to finish and paint the hallway leading down to the game room in order to do this
I also made some good progress on the pinball book/toy shelf I was making for my son's room. This is from a donated Countdown cabinet I got from a member here a while back. I just need to finish the lower drawer (complete with plunger pull) and then I can move onto the head cabinet/hotwheels display.
[url=https://flic.kr/p/zdxLJ3]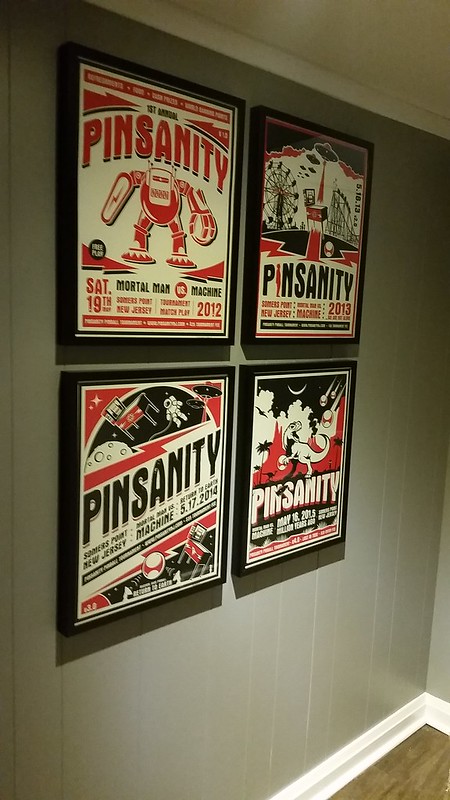
[url=https://flic.kr/p/yhyzaA]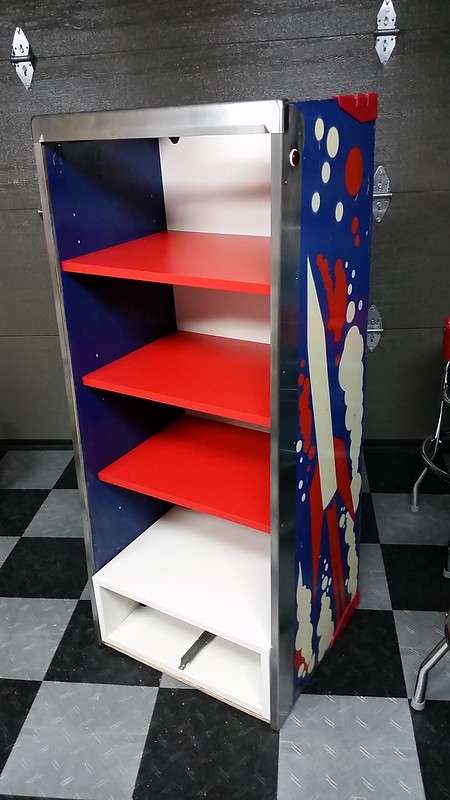
I also sold my Strange Science a few weeks ago. I managed to get a sweet Fireball Classic for Brewmanager in partial trade for it which was a bonus! Several other games found their way into the lineup as well. At the studio I set up my Bally Eight Ball and peeled back some very low tack Mylar or vinyl to reveal a gorgeous playfield! My new Grand Lizard also got set up in the game room with Joker Poker being pulled out for some cabinet restoration and eventual CPR playfield swap. I even drove down to Cuba NY to pick up a very decent Stern Meteor... so now I'm officially in the classic stern club. Fantastic pin but the hacked drop targets really bug me so I have recently gotten a full new set from PBR and am in the process of swapping them all out.
[url=https://flic.kr/p/yhyz7E]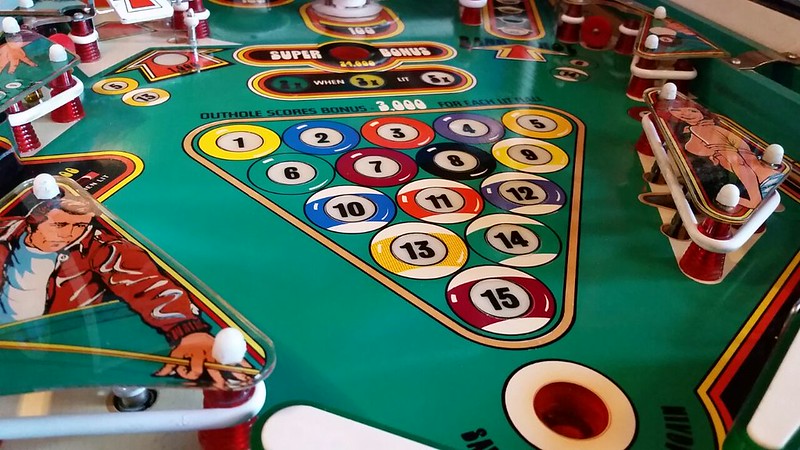
[url=https://flic.kr/p/yhyKh9]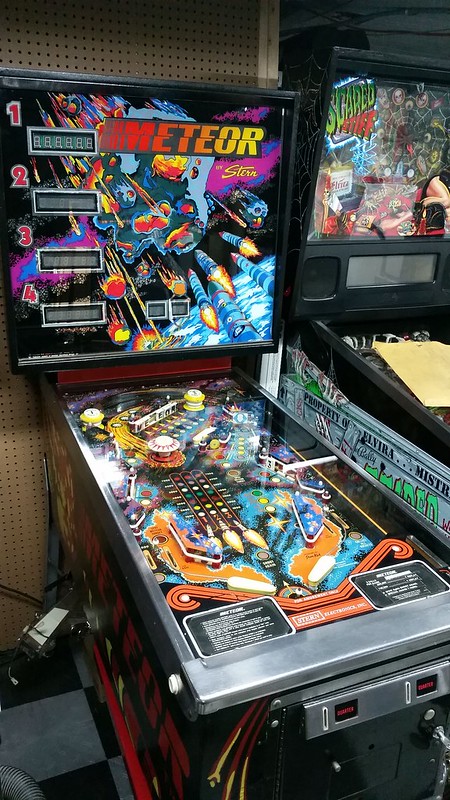
[url=https://flic.kr/p/yhyLJN]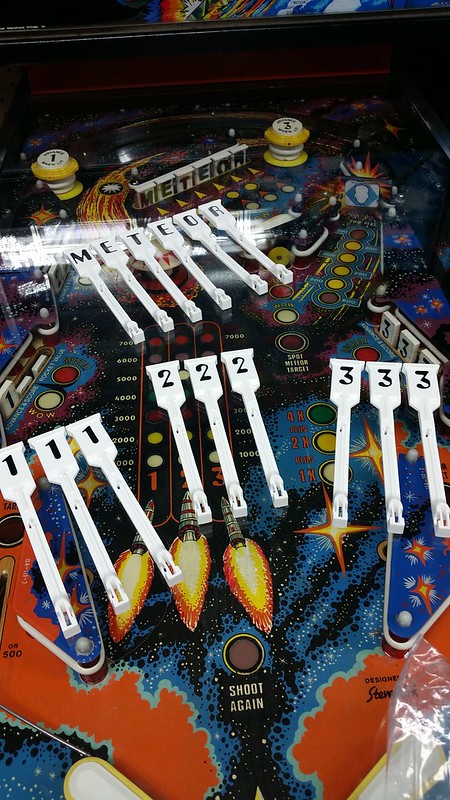
Phew!!! Lots going on... and I'm sure I've missed a few things.
I'll dig deeper into some of these mini projects as I go and post more details.
That's all for now.
Thanks!
Dr.@NO[/url][/url][/url][/url][/url][/url][/url][/url][/url]
I did have a lot of pinball action though. Scared Stiff has been put on hold for a little while but I have started to prepare for a large batch of playfields that need some touch-up and clearcoating.

I have a few others that need work (CC, SS and Shadow) but I really didn't want to get into stripping those and have even more projects on the go. Note... CC did get brought home just lat week and will be next in queue. Most of these playfields pictured above require minimal work... except for STTNG.
This isn't one of my games. I took on this project for Menace (or rather one of his clients). I can't wait for payback when I drop off my beat to crap Cyclone for service
In any case, this playfield had been "restored" by someone but it was really a bit of a mess. Not only were some of the touch-ups horrendous, but the clear was de-laminating in some key areas. To make matters worse, this was all coated with Varathane instead of automotive clear.
I was only asked to sand it to remove the orange peel and cloudiness of the clearcoat and redo it. I offered no guarantees because mixing auto clear over top of Varathane isn't ideal and I would need to at least repair 3 arrow inserts that were too poor to leave alone.
I decided to pop out the inserts, sand them clean, re-insert and eventually apply new waterslide decals. I had to hand sand this first layer because I was really nervous about the quality of the existing finish. Here are some progress shots. I hope to get this done in the next couple of weeks and will post updates.
[url=https://flic.kr/p/zfrWrZ]

[url=https://flic.kr/p/zfrVG2]

[url=https://flic.kr/p/zfrVQP]

[url=https://flic.kr/p/yhztTw]

I also jumped on a few other small pinball related projects. Finally got my PINSANITY posters framed and hung. Of course I had to finish and paint the hallway leading down to the game room in order to do this
I also made some good progress on the pinball book/toy shelf I was making for my son's room. This is from a donated Countdown cabinet I got from a member here a while back. I just need to finish the lower drawer (complete with plunger pull) and then I can move onto the head cabinet/hotwheels display.
[url=https://flic.kr/p/zdxLJ3]

[url=https://flic.kr/p/yhyzaA]

I also sold my Strange Science a few weeks ago. I managed to get a sweet Fireball Classic for Brewmanager in partial trade for it which was a bonus! Several other games found their way into the lineup as well. At the studio I set up my Bally Eight Ball and peeled back some very low tack Mylar or vinyl to reveal a gorgeous playfield! My new Grand Lizard also got set up in the game room with Joker Poker being pulled out for some cabinet restoration and eventual CPR playfield swap. I even drove down to Cuba NY to pick up a very decent Stern Meteor... so now I'm officially in the classic stern club. Fantastic pin but the hacked drop targets really bug me so I have recently gotten a full new set from PBR and am in the process of swapping them all out.
[url=https://flic.kr/p/yhyz7E]

[url=https://flic.kr/p/yhyKh9]

[url=https://flic.kr/p/yhyLJN]

Phew!!! Lots going on... and I'm sure I've missed a few things.
I'll dig deeper into some of these mini projects as I go and post more details.
That's all for now.
Thanks!
Dr.@NO[/url][/url][/url][/url][/url][/url][/url][/url][/url]
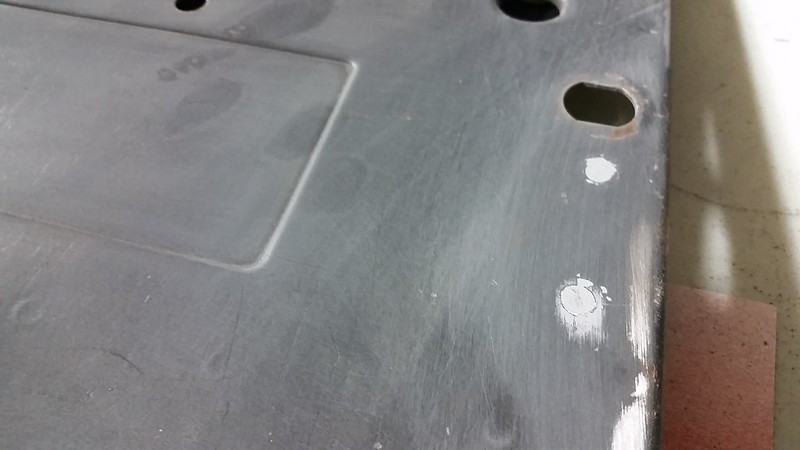
I love a good coin door refresh and, since the Meteor I pictured above had a mismatched black door that had also been drilled, I decided a little cleanup was in order. I took everything apart, filled in the holes with liquid metal and sanded smooth (remember to 'goop' it a little heavier on the back side or else your filler will just pop out once you sand it flush).
Then a quick coat of primer, silver hammertone paint and some new stickers and voila! new coin door. Since this wasn't the original door it did have an extra hole for a coin reject button that doesn't exist. I decided to leave that as-is for now. The US cleaner also did a great job on the coin chutes!
[url=https://flic.kr/p/z81nHC]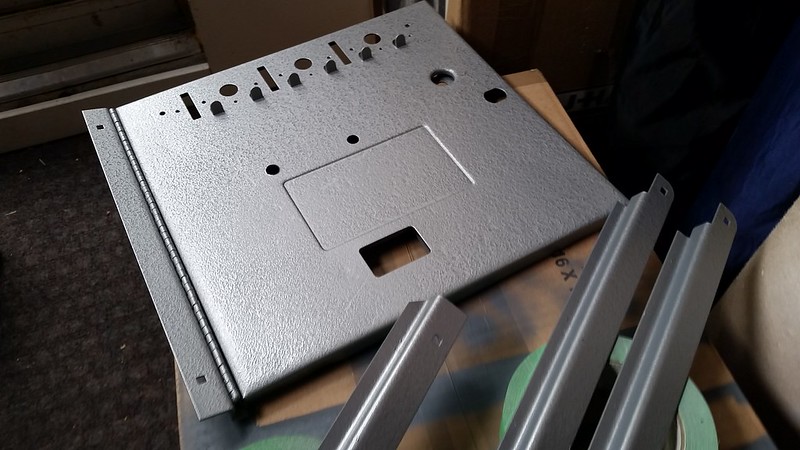
[url=https://flic.kr/p/zMwwVc]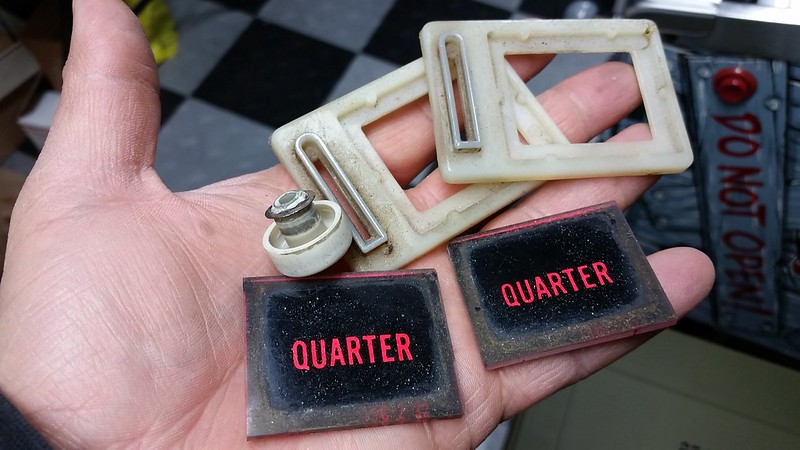
[url=https://flic.kr/p/A53gun]
[url=https://flic.kr/p/z89TW6]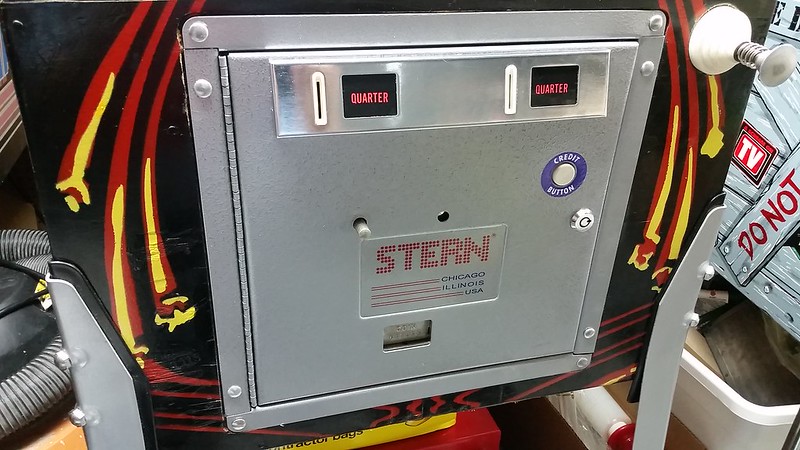
I also thought the new drop targets would be a hassle to install. It did take a little time but overall it went very smoothly.
The METEOR bank even had it's own connector o I was able to pull it right out of the game. The others had to be done in-situ, but I decided to pull the entire playfield and place it on a tabletop rotisserie, so it made life a lot nicer.
[url=https://flic.kr/p/A2PKos]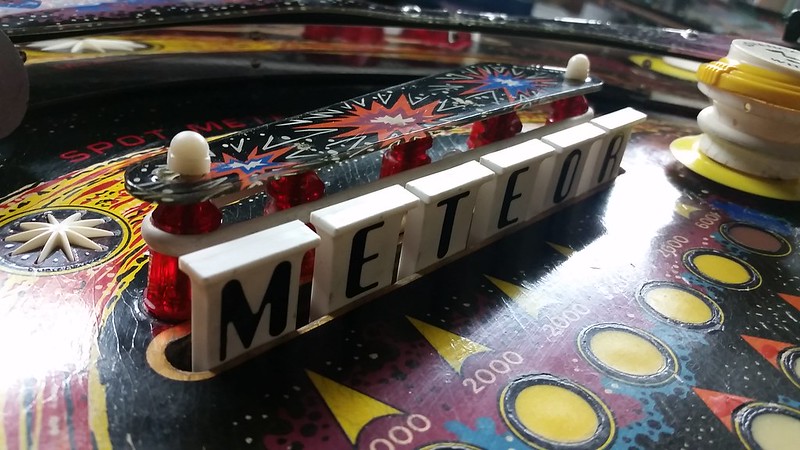
In the end, Meteor is looking and playing great now. It's a surprisingly fun game and I love the scoring strategy where the drop targets are tied to the spinner value. Do I complete METEOR one more time for added bonus x, or leave one target standing so my spinner value is maxed out and rip the spinner? It doesn't help that there are about 6 other switches on the playfield that can inadvertently drop that last target. It's quite the balancing act!
The only item left was to replace the spinner for an original Stern. I did some good research and testing on this topic so I'll post in in a separate thread.
That's all for now.
Dr.@NO[/url][/url][/url][/url][/url]
Then a quick coat of primer, silver hammertone paint and some new stickers and voila! new coin door. Since this wasn't the original door it did have an extra hole for a coin reject button that doesn't exist. I decided to leave that as-is for now. The US cleaner also did a great job on the coin chutes!

[url=https://flic.kr/p/z81nHC]

[url=https://flic.kr/p/zMwwVc]

[url=https://flic.kr/p/A53gun]

[url=https://flic.kr/p/z89TW6]

I also thought the new drop targets would be a hassle to install. It did take a little time but overall it went very smoothly.
The METEOR bank even had it's own connector o I was able to pull it right out of the game. The others had to be done in-situ, but I decided to pull the entire playfield and place it on a tabletop rotisserie, so it made life a lot nicer.
[url=https://flic.kr/p/A2PKos]

In the end, Meteor is looking and playing great now. It's a surprisingly fun game and I love the scoring strategy where the drop targets are tied to the spinner value. Do I complete METEOR one more time for added bonus x, or leave one target standing so my spinner value is maxed out and rip the spinner? It doesn't help that there are about 6 other switches on the playfield that can inadvertently drop that last target. It's quite the balancing act!
The only item left was to replace the spinner for an original Stern. I did some good research and testing on this topic so I'll post in in a separate thread.
That's all for now.
Dr.@NO[/url][/url][/url][/url][/url]
Fifty
Active Member
I'm so glad you are posting in here again!
Just been busy. I have no plans to go away just yet
Nice work bro. Sweet!
Storytellers don't go away though.
Just overly busy humans are; distracted...
By; hobbies when we "can"; and work, when we "must".
Storytellers don't go away though.
Just overly busy humans are; distracted...
By; hobbies when we "can"; and work, when we "must".
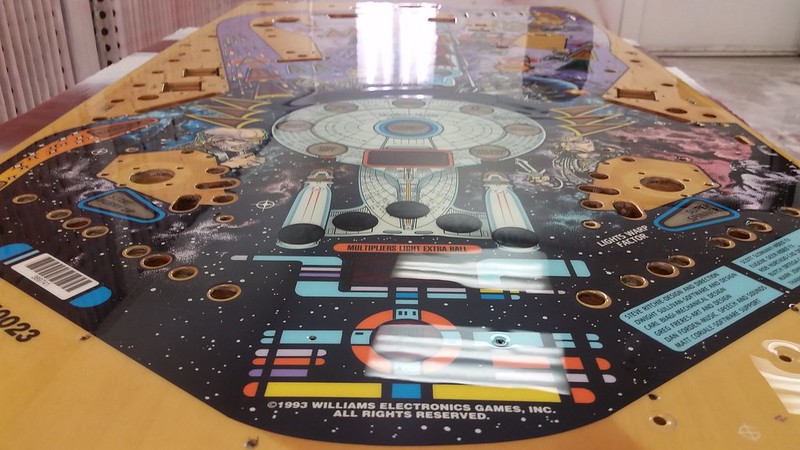
Thought I'd post a little update on that STTNG playfield I showed a few weeks ago.
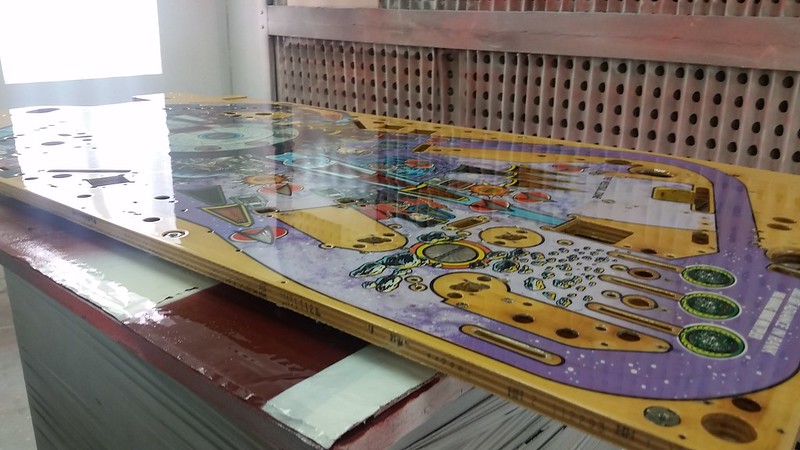
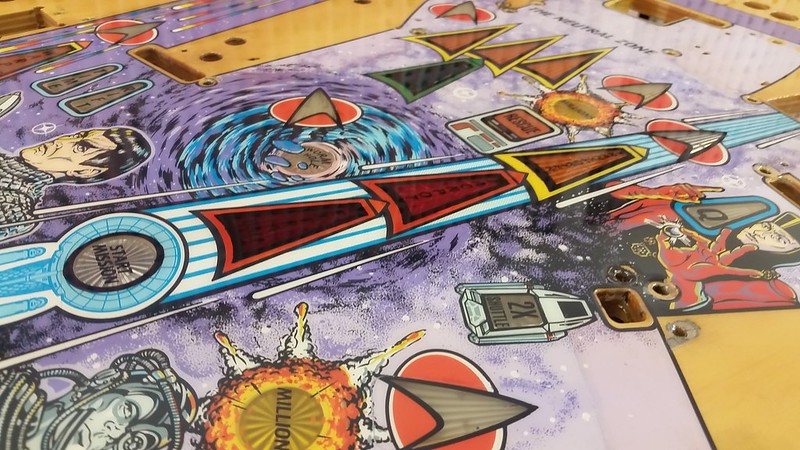
After I glued the inserts back in I sealed it all up with clearcoat and created 3 water-slide decals, did a few small further touch-ups on some black outlines and performed a few more layers of clear to seal it all up.
All in all, not a playfield I would normally put my name to, but considering the condition it arrived in and the dull orange peeled varathane finish that was originally on it, I'm pretty happy with the results.
Here are a few pics taken just after the final layer was shot.
Dr.@NO


Last edited:
THE BIG PAYBACK
Part 1
Although this post has little to do with James Brown, it has a lot to do with the hardest working man in EM cab repair... at least within a 100 mile radius
A few of you have seen the great EM cabinet restores done by our very own Rob/Spiroagnew of CreditDotPinball during this past Summer. One of those happened to be for my GTB Joker Poker; which I just recently got put back together and am preparing to perform a CPR playfield swap on over the holidays.
 https://flic.kr/p/BCMFBQ
In compensation for Rob's generous offer to do this for me I accepted the challenge of restoring and clearcoating an NOS playfield that he found for his newly acquired Bally ATLANTIS!
Now, most NOS playfields don't require restoration but, as far as we can figure, this one must have been a factory second as it had several little scratches in the art and a large sunken impression in the wood about 7-8" long and almost 1/8" deep. It even damaged one of the inserts.
[url=https://flic.kr/p/B8j3nm]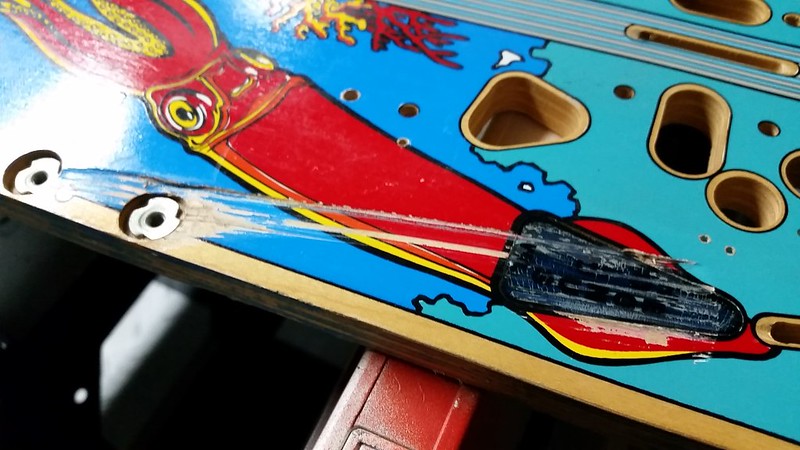 https://flic.kr/p/B8j3nm
[url=https://flic.kr/p/B8j3qN]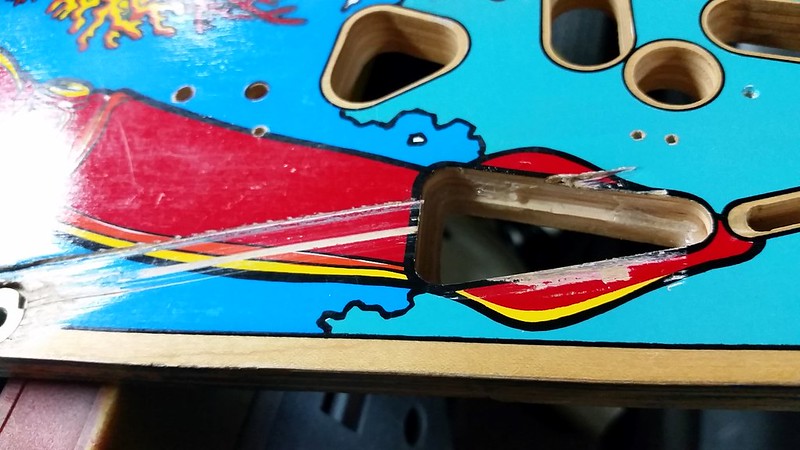 https://flic.kr/p/B8j3qN
[url=https://flic.kr/p/C3vPLQ]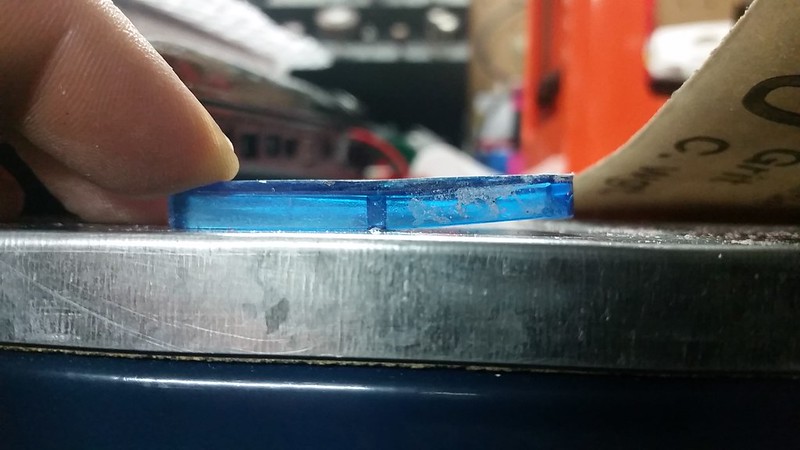 https://flic.kr/p/C3vPLQ
The insert wasn't going to be saved and we faced one more hurdle. Nobody seemed to stock a replacement in the original blue... so we were faced with two options. Since I was going to have to scan and print a waterslide decal for the new insert text anyway, I could try printing it in blue and overlay it onto a clear insert. The other option was to use a readily available red insert and, although it wouldn't be factory, it would blend really nicely into the red squid on the artwork. Once Rob's parts arrived we did this quick test and decided on the red.
[url=https://flic.kr/p/B8pFxx]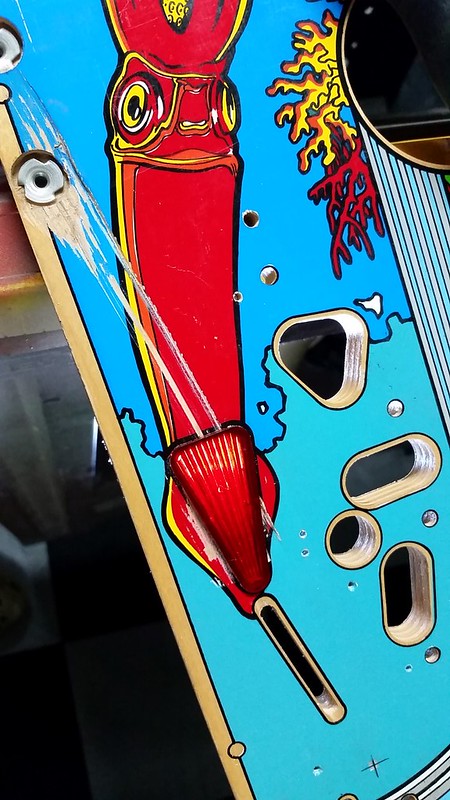 https://flic.kr/p/B8pFxx
Next came the filling/repair of the wood. I did my typical masking with a couple of layers of painters tape in order to minimize cleanup and protect the surrounding art when I eventually sand it smooth.
I use a Minwax "high performance" wood filler for shallow repairs like this but it's basically not much different from Bondo. I like to apply it as thin as possible... again, to keep things neat and save me as much sanding work as possible.
[url=https://flic.kr/p/BCG9eu]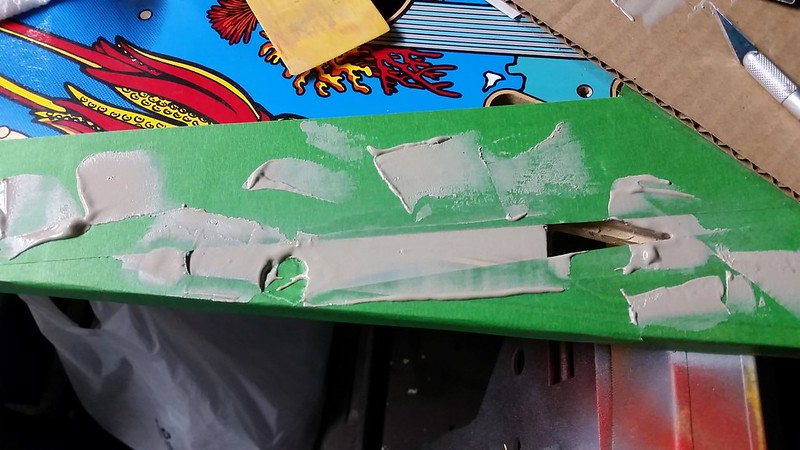 https://flic.kr/p/BCG9eu
Once the filler was cured I took a series of different sanding blocks to get it smooth and then I peeled back the tape and proceeded to draw in the black outlines for reference.
[url=https://flic.kr/p/BCG9fw]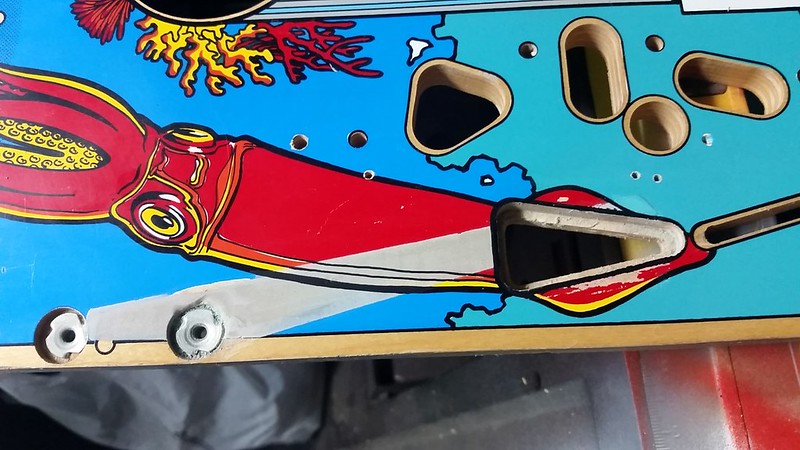 https://flic.kr/p/BCG9fw
Now, at this point you'd normally want to apply a quick coat of clear just to seal everything in before doing any colour touch-ups. However, I know that it'll take a few layers of paint with the airbrush to cover the repair, so I decided to just lay down some basic colours using my Molotow acrylic pens. I wasn't too worried about a perfect match, I just wanted to get a 'primer' coat down to make the airbrush work go easier.
[url=https://flic.kr/p/BXwPtZ]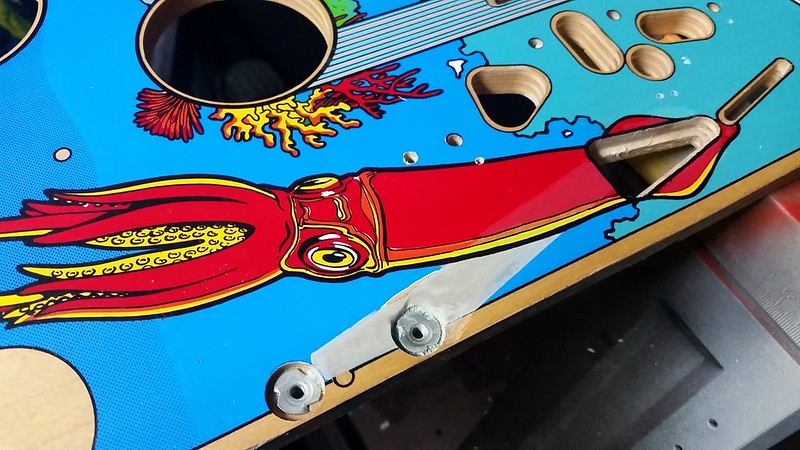 https://flic.kr/p/BXwPtZ
[url=https://flic.kr/p/BwiDvg]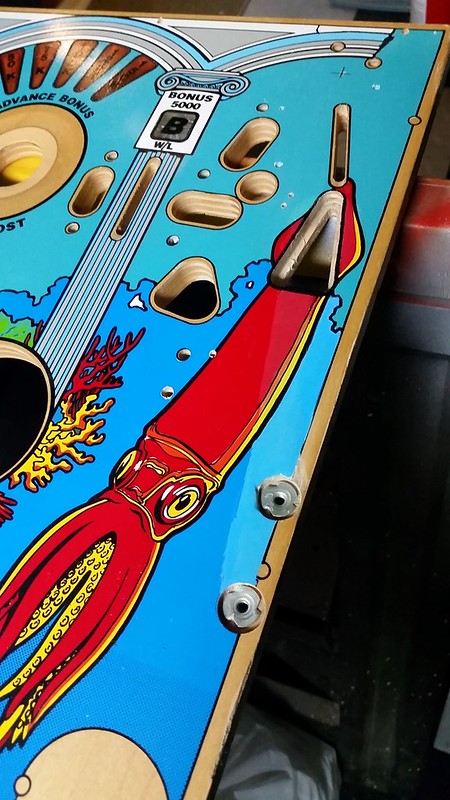 https://flic.kr/p/BwiDvg
With the hard part done I figured I'd go around with the black Molotow and repair any outlines. Surprisingly this playfield needed quite a bit of minor touch-up around the inserts. Not wanting to push my luck any further I got it into the booth and laid down the first layer of clearcoat just to protect the work done up until this point. It wasn't pretty as the first layer was a bit rough, but a quick sand and it was ready to come home for some more painting.
[url=https://flic.kr/p/BXwPzv] https://flic.kr/p/BXwPzv
That's it for the first half of this project.
I'll post the final stages in the next week or two.
Thanks for reading!
Dr.@NO[/url][/url][/url][/url][/url][/url][/url][/url][/url]
Part 1
Although this post has little to do with James Brown, it has a lot to do with the hardest working man in EM cab repair... at least within a 100 mile radius
A few of you have seen the great EM cabinet restores done by our very own Rob/Spiroagnew of CreditDotPinball during this past Summer. One of those happened to be for my GTB Joker Poker; which I just recently got put back together and am preparing to perform a CPR playfield swap on over the holidays.
 https://flic.kr/p/BCMFBQ
In compensation for Rob's generous offer to do this for me I accepted the challenge of restoring and clearcoating an NOS playfield that he found for his newly acquired Bally ATLANTIS!
Now, most NOS playfields don't require restoration but, as far as we can figure, this one must have been a factory second as it had several little scratches in the art and a large sunken impression in the wood about 7-8" long and almost 1/8" deep. It even damaged one of the inserts.
[url=https://flic.kr/p/B8j3nm]
 https://flic.kr/p/B8j3nm
[url=https://flic.kr/p/B8j3qN]
 https://flic.kr/p/B8j3qN
[url=https://flic.kr/p/C3vPLQ]
 https://flic.kr/p/C3vPLQ
The insert wasn't going to be saved and we faced one more hurdle. Nobody seemed to stock a replacement in the original blue... so we were faced with two options. Since I was going to have to scan and print a waterslide decal for the new insert text anyway, I could try printing it in blue and overlay it onto a clear insert. The other option was to use a readily available red insert and, although it wouldn't be factory, it would blend really nicely into the red squid on the artwork. Once Rob's parts arrived we did this quick test and decided on the red.
[url=https://flic.kr/p/B8pFxx]
 https://flic.kr/p/B8pFxx
Next came the filling/repair of the wood. I did my typical masking with a couple of layers of painters tape in order to minimize cleanup and protect the surrounding art when I eventually sand it smooth.
I use a Minwax "high performance" wood filler for shallow repairs like this but it's basically not much different from Bondo. I like to apply it as thin as possible... again, to keep things neat and save me as much sanding work as possible.
[url=https://flic.kr/p/BCG9eu]
 https://flic.kr/p/BCG9eu
Once the filler was cured I took a series of different sanding blocks to get it smooth and then I peeled back the tape and proceeded to draw in the black outlines for reference.
[url=https://flic.kr/p/BCG9fw]
 https://flic.kr/p/BCG9fw
Now, at this point you'd normally want to apply a quick coat of clear just to seal everything in before doing any colour touch-ups. However, I know that it'll take a few layers of paint with the airbrush to cover the repair, so I decided to just lay down some basic colours using my Molotow acrylic pens. I wasn't too worried about a perfect match, I just wanted to get a 'primer' coat down to make the airbrush work go easier.
[url=https://flic.kr/p/BXwPtZ]
 https://flic.kr/p/BXwPtZ
[url=https://flic.kr/p/BwiDvg]
 https://flic.kr/p/BwiDvg
With the hard part done I figured I'd go around with the black Molotow and repair any outlines. Surprisingly this playfield needed quite a bit of minor touch-up around the inserts. Not wanting to push my luck any further I got it into the booth and laid down the first layer of clearcoat just to protect the work done up until this point. It wasn't pretty as the first layer was a bit rough, but a quick sand and it was ready to come home for some more painting.
[url=https://flic.kr/p/BXwPzv]
 https://flic.kr/p/BXwPzv
That's it for the first half of this project.
I'll post the final stages in the next week or two.
Thanks for reading!
Dr.@NO[/url][/url][/url][/url][/url][/url][/url][/url][/url]


